UILabel 显示一行或多行只读文本的视图,通常与其他控件一起使用以描述其预期目的。
属性
Core attributes 核心属性
Text( text、attributedText )、textColor、font、textAligment、Lines( numberOfLines )、Behavior( enabled、highlighted )。
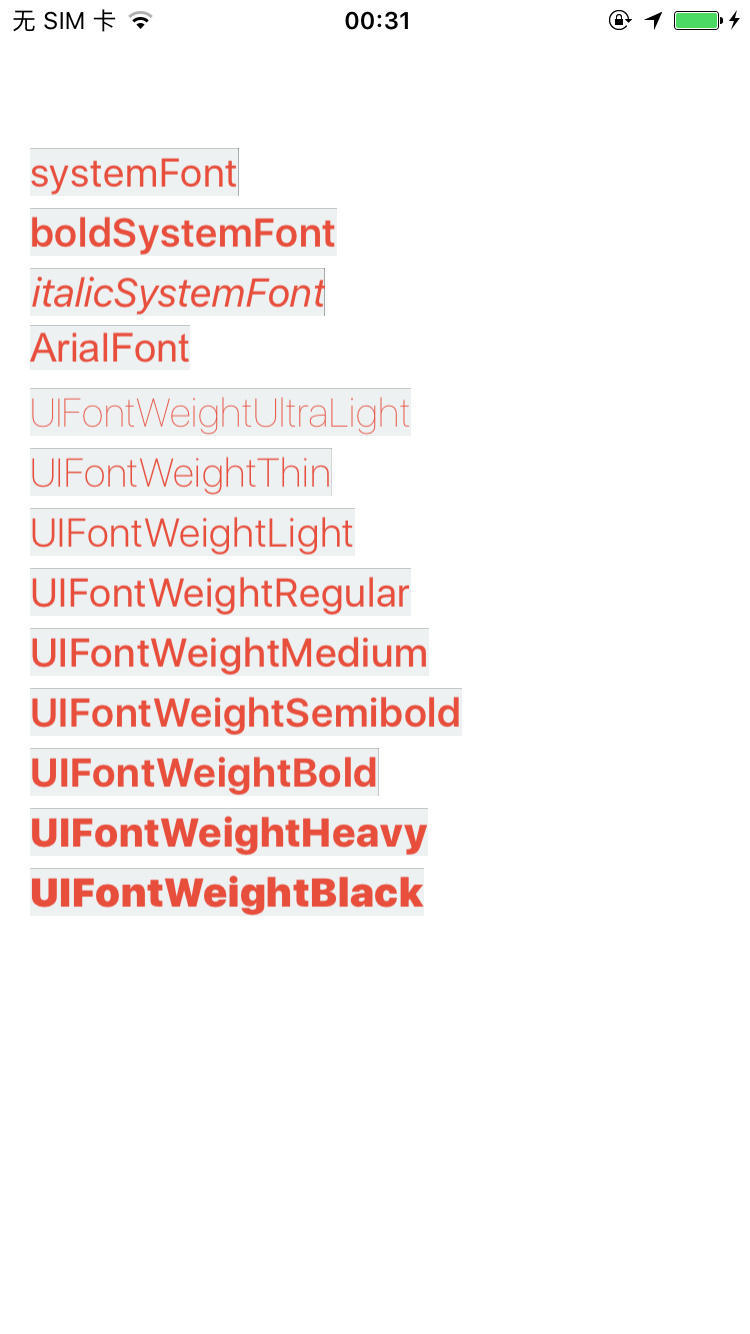
font:默认字体为:system font 17 plain// 通常的几种设置方法 label.font = [UIFont systemFontOfSize:20]; label.font = [UIFont boldSystemFontOfSize:20]; label.font = [UIFont italicSystemFontOfSize:20]; label.font = [UIFont fontWithName:@"Arial" size:20]; // PS:字体名可以打开「字体册」应用查找 label.font = [UIFont systemFontOfSize:20 weight:UIFontWeightUltraLight];系统字体参考:iOS 查看系统所有字体 (带效果图)
以下为字体大小为 20 号时的显示情况:
![]()
textAligment:文本对齐方式,默认设置为NSTextAlignmentNatural,实际测试默认为左对齐,即NSTextAlignmentLeft。/* Values for NSTextAlignment */ typedef NS_ENUM(NSInteger, NSTextAlignment) { NSTextAlignmentLeft = 0, // 左对齐 #if TARGET_OS_iPhone NSTextAlignmentCenter = 1, // 居中 NSTextAlignmentRight = 2, // 右对齐 #else /* !TARGET_OS_iPhone */ NSTextAlignmentRight = 1, // 右对齐 NSTextAlignmentCenter = 2, // 居中 #endif NSTextAlignmentJustified = 3, // Fully-justified. The last line in a paragraph is natural-aligned. NSTextAlignmentNatural = 4, // Indicates the default alignment for script } NS_ENUM_AVAILABLE_IOS(6_0);
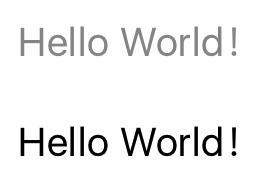
numberOfLines:默认为 1 行。如果设置为 0,则代表不限制行数。enabled:此属性仅确定标签的绘制方式。 禁用时文字有些暗淡,表示它处于非活动状态。 此属性默认设置为 YES。如图所示:上方为
enabled = NO, 下方为enabled = YES。![]()
highlighted: 高亮属性,该属性用于当 UILabel 作为其他控件的子视图时,作为按下状态时的属性。the ‘highlight’ property is used by subclasses for such things as pressed states. it’s useful to make it part of the base class as a user property.
userInteractionEnabled: 是否能与用户交互?
Spacing attributes 间距属性
Baseline ( baselineAdjustment )、LineBreaks ( lineBreakMode)、Autoshrink ( minimumScaleFactor、allowsDefaultTighteningForTruncation )
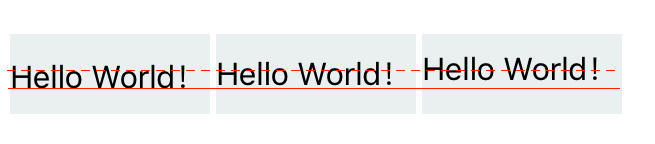
baselineAdjustment:文本基线对齐方式// 控制文本的基线位置,只有文本的行数为1时有效 // adjustsFontSizeToFitWidth = YES 并且文本需要缩小时才会起作用。 typedef NS_ENUM(NSInteger, UIBaselineAdjustment) { UIBaselineAdjustmentAlignBaselines = 0, // default. used when shrinking text to position based on the original baseline UIBaselineAdjustmentAlignCenters, // 文本中线与label中线对齐 UIBaselineAdjustmentNone, // 文本最低端与label中线对齐 };
从左至右分别为:0、1、2 三种情况:
lineBreakMode:超出 label 边界的文字截取方式。typedef NS_ENUM(NSInteger, NSLineBreakMode) { NSLineBreakByWordWrapping = 0, // 默认,以单词为边界 "my word" NSLineBreakByCharWrapping, // 以字符为边界 "my wor" NSLineBreakByClipping, // 到边界为止,碰到边界就剪辑 NSLineBreakByTruncatingHead, // 省略开头: "...wxyz" NSLineBreakByTruncatingTail, // 省略结尾: "abcd..." NSLineBreakByTruncatingMiddle // 省略中间: "ab...yz",多行时作用于最后一行 } NS_ENUM_AVAILABLE(10_0, 6_0);
Advanced appearance attributes 高级外观属性
highlightedTextColor、shadowColor、shadowOffset
使用 UILabel
通常的使用方式
// 创建 UILabel 对象
UILabel *label = [[UILabel alloc] init];
label.frame = CGRectMake(15, 100, 125, 24);
label.tag = 5;
label.text = @"Hello World!";
label.font = [UIFont systemFontOfSize:20];
label.textAlignment = NSTextAlignmentCenter;
label.textColor = [UIColor blueColor];
label.backgroundColor = [UIColor lightGrayColor];
label.lineBreakMode = NSLineBreakByTruncatingTail;
label.numberOfLines = 0;
[self.view addSubview:label];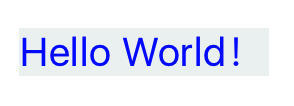
设置自动缩小文本字体以适应 label 宽度
adjustsFontSizeToFitWidth
UILabel *label2 = [[UILabel alloc] initWithFrame:CGRectMake(15, 150, 80, 35)];
label2.text = @"Hello World!";
label2.font = [UIFont systemFontOfSize:20];
label2.textAlignment = NSTextAlignmentCenter;
label2.backgroundColor = [UIColor flatWhiteColor];

// 当 Label 的宽度小于完整字符串宽度时,缩小文本字体以适应宽度
label2.adjustsFontSizeToFitWidth = YES;

// 当 adjustsFontSizeToFitWidth = YES 时,如果文本 font 要缩小时,
// 可以设置 baselineAdjustment来控制文本的基线位置,只有文本行数为1时有效。
label2.baselineAdjustment = UIBaselineAdjustmentAlignCenters;
label2.numberOfLines = 1; // 默认为1,可以省略

// 字体最小比例因子
// 当文本字体缩小时,缩放比例 >= minimumScaleFactor
label2.minimumScaleFactor = 0.5;

[self.view addSubview:label2];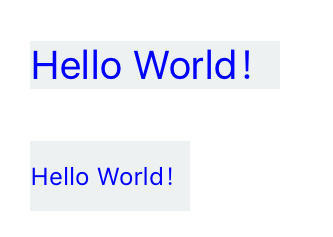
如何根据字符串长度设置 label 的 frame ?
根据字符串长度计算出 CGSize,然后赋值给 label 的 frame:
计算字符串长度有 2 个可用的方法:
- (CGSize)sizeWithAttributes:(nullable NSDictionary<NSString *, id> *)attrs NS_AVAILABLE(10_0, 7_0);

- (CGRect)boundingRectWithSize:(CGSize)size options:(NSStringDrawingOptions)options attributes:(nullable NSDictionary<NSString *, id> *)attributes context:(nullable NSStringDrawingContext *)context NS_AVAILABLE(10_11, 7_0);
方法一示例代码:
// 需要显示的字符串
NSString *string = @"Hello World!";
// 字符串在  UILabel 上显示时所使用的字体
UIFont *font = [UIFont systemFontOfSize:20];
// 计算20号字体下,该字符串的宽度和高度
CGSize stringSize = [string sizeWithAttributes:@{NSFontAttributeName:font}];
NSLog(@"(%f,%f)",stringSize.width,stringSize.height); // (123.651484,23.867188)
⚠️
需要注意的是,该方法返回的
CGSize是行数为 1 的情况下,计算出来的 Size。当它超过屏幕的宽度([UIScreen mainScreen].bounds.size.width)时,还会存在文本显示不完全的问题。因此,该方法仅适用于短文本,还有一种情况是做跑马灯效果时会用到这种方法。
方法二示例代码 1:
相对于上者,此方法需要传入一个 CGSize 参数来限制最大宽高尺寸,可以处理多行文本情况。
+ (void)resizeUILabelWidth:(UILabel *)label {
    label.lineBreakMode = NSLineBreakByTruncatingTail;

    CGRect rect = label.frame;
    NSString *str = label.text;
    UIFont *font = label.font;
    CGSize size = CGSizeMake(rect.size.width, rect.size.height);
    NSDictionary *attributes = @{NSFontAttributeName:font};
    // 计算大小
    CGRect labelSize = [str boundingRectWithSize:size
                                         options:NSStringDrawingUsesLineFragmentOrigin
                                      attributes:attributes
                                         context:nil];
    // 调整frame
    rect.size.width = labelSize.size.width;
    rect.size.height = labelSize.size.height;
    label.frame = rect;
}
方法二示例代码 2:
- (CGSize)sizeForFont:(UIFont *)font size:(CGSize)size mode:(NSLineBreakMode)lineBreakMode {
    CGSize result;
    if (!font) font = [UIFont systemFontOfSize:12];
    if ([self respondsToSelector:@selector(boundingRectWithSize:options:attributes:context:)]) {
        NSMutableDictionary *attr = [NSMutableDictionary new];
        attr[NSFontAttributeName] = font;
        if (lineBreakMode != NSLineBreakByWordWrapping) {
            NSMutableParagraphStyle *paragraphStyle = [NSMutableParagraphStyle new];
            paragraphStyle.lineBreakMode = lineBreakMode;
            attr[NSParagraphStyleAttributeName] = paragraphStyle;
        }
        CGRect rect = [self boundingRectWithSize:size
                                         options:NSStringDrawingUsesLineFragmentOrigin | NSStringDrawingUsesFontLeading
                                      attributes:attr context:nil];
        result = rect.size;
    } else {
#pragma clang diagnostic push
#pragma clang diagnostic ignored "-Wdeprecated-declarations"
        result = [self sizeWithFont:font constrainedToSize:size lineBreakMode:lineBreakMode];
#pragma clang diagnostic pop
    }
    return result;
}
上述方法摘自 YYKit :NSString+YYAdd
该类中有三个计算字符串大小的方法:
- -(CGSize)sizeForFont:(UIFont *)font size:(CGSize)size mode:(NSLineBreakMode)lineBreakMode;
- -(CGFloat)widthForFont:(UIFont *)font;
- -(CGFloat)heightForFont:(UIFont *)font width:(CGFloat)width;
根据文本内容调整 UILabel 对象的大小
UIView 中的两个方法:
- (CGSize)sizeThatFits:(CGSize)size;
// return 'best' size to fit given size. does not actually resize view. Default is return existing view size
// 返回“最佳”大小以适应给定的大小,默认返回已经存在的视图 size

- (void)sizeToFit;
// calls sizeThatFits: with current view bounds and changes bounds size.
// 调用这个方法会改变当前 view 的 bounds.size
sizeToFit 代码示例一:
// 代码示例三:label 大小自适应文本
UILabel *label3 = [[UILabel alloc] init];
label3.frame = CGRectMake(15, 150, 125, 24);
label3.text = @"Hello iOS! Hello World!";
label3.font = [UIFont systemFontOfSize:20];
label3.textAlignment = NSTextAlignmentCenter;
label3.textColor = [UIColor blueColor];
label3.backgroundColor = [UIColor flatWhiteColor];
label3.lineBreakMode = NSLineBreakByTruncatingTail;

// 设置 sizeToFit
[label3 sizeToFit];
label3.numberOfLines = 0;
[self.view addSubview:label3];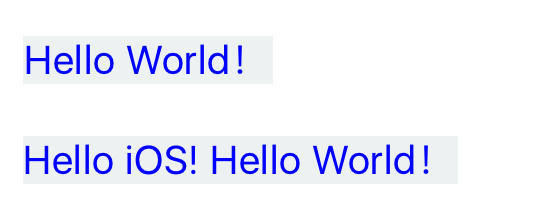
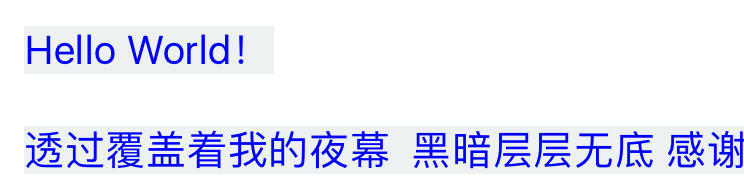
sizeToFit 代码示例二:
当文本非常长的情况:
UILabel *label3 = [[UILabel alloc] init];
label3.frame = CGRectMake(15, 150, 125, 24);
label3.text = @"透过覆盖着我的夜幕  黑暗层层无底 感谢万能的上苍 赐给我不可征服的灵魂 就算被地狱牢牢抓住 我不会畏縮 也不会哭叫 任凭命运百般作弄 我头破血流但不低头 在这充满愤怒和眼泪的土地之上 恐怖阴影阴森的逼近 不过,即使岁月不停恐吓 亦将发现我毫不畏惧 无论大门何等狭窄 无论承受多么深重的责罚 我是我命运的主宰 我是我灵魂的统帅";
label3.font = [UIFont systemFontOfSize:20];
label3.textAlignment = NSTextAlignmentCenter;
label3.textColor = [UIColor blueColor];
label3.backgroundColor = [UIColor flatWhiteColor];
label3.lineBreakMode = NSLineBreakByTruncatingTail;

[label3 sizeToFit];
label3.numberOfLines = 0;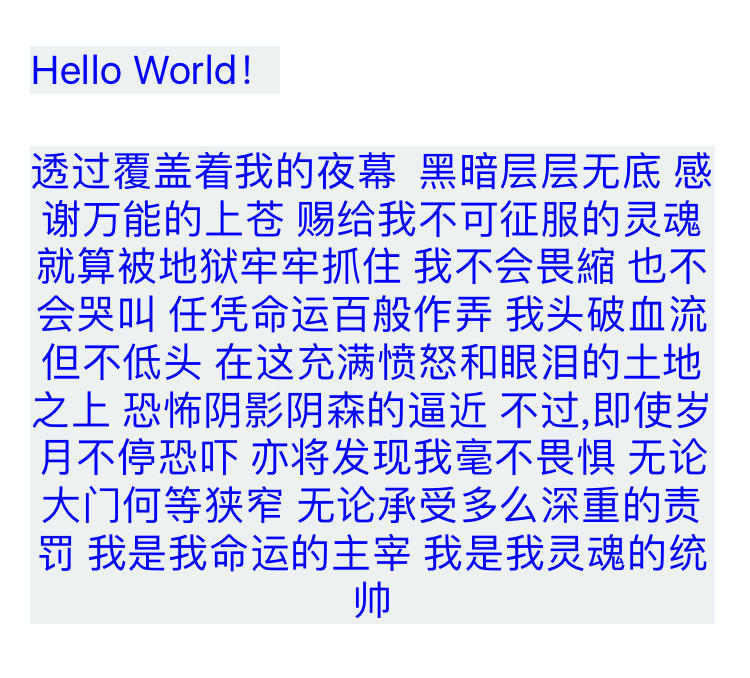
[self.view addSubview:label3];测试发现,当文本太长显示不完全时,sizeToFit 并不会自动换行。
sizeThatFits: 代码示例一:
UILabel *label3 = [[UILabel alloc] init];
label3.frame = CGRectMake(15, 150, 125, 24);
label3.text = @"透过覆盖着我的夜幕  黑暗层层无底 感谢万能的上苍 赐给我不可征服的灵魂 就算被地狱牢牢抓住 我不会畏縮 也不会哭叫 任凭命运百般作弄 我头破血流但不低头 在这充满愤怒和眼泪的土地之上 恐怖阴影阴森的逼近 不过,即使岁月不停恐吓 亦将发现我毫不畏惧 无论大门何等狭窄 无论承受多么深重的责罚 我是我命运的主宰 我是我灵魂的统帅";
label3.font = [UIFont systemFontOfSize:20];
label3.textAlignment = NSTextAlignmentCenter;
label3.textColor = [UIColor blueColor];
label3.backgroundColor = [UIColor flatWhiteColor];
label3.lineBreakMode = NSLineBreakByTruncatingTail;
label3.numberOfLines = 0;

// 限定 label 的宽度和高度,让 label 在此范围内自适应
CGSize size = [label3 sizeThatFits:CGSizeMake([UIScreen mainScreen].bounds.size.width - 15*2, MAXFLOAT)];
label3.frame = CGRectMake(15, 150, size.width, size.height);

[self.view addSubview:label3];
🎉🎉🎉 你看,它做到了,真棒!
sizeThatFits: 代码示例二:
// 初始化标签对象
UILabel *label = [[UILabel alloc] init];
// 给标签对象设置一段较长的文本内容
label.text = @"The appearance of labels is configurable, and they can display attributed strings, allowing you to customize the appearance of substrings within a label. You can add labels to your interface programmatically or by using Interface Builder.";
// 设置标签文字的颜色
label.textColor = [UIColor flatSkyBlueColor];
// 设置标签文字的对齐方式
label.textAlignment = NSTextAlignmentLeft;
// 设置标签文字的换行方式为以空格为界,保留整个单词
label.lineBreakMode = NSLineBreakByWordWrapping;
// 设置标签不限制行数
label.numberOfLines = 0;
// 设置标签的背景颜色
label.backgroundColor = [UIColor lightGrayColor];
// 限定 label 的宽度和高度,让 label 在此范围内自适应
CGSize size = [label sizeThatFits:CGSizeMake([UIScreen mainScreen].bounds.size.width - 15*2, MAXFLOAT)];
label.frame = CGRectMake(15, 150, size.width, size.height);
// 将标签对象,添加到当前视图控制器的根视图
[self.view addSubview:label];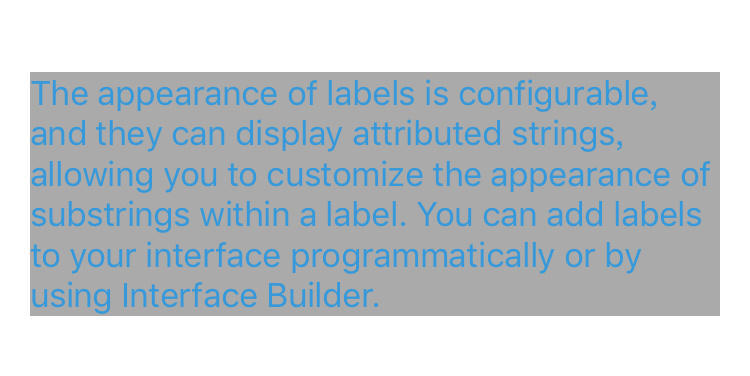
实例模仿:
参考淘票票的 TableViewCell:
- 样式一:影城卡、卡、惠;
- 样式二:小食、巨幕厅;
- 样式三:25.8 元起
- 样式四:3DIMAX tag

设置圆角
UILabel *label = [[UILabel alloc] init];
label.frame = CGRectMake(15, 100, 55, 25);
label.text = @"影城卡";
label.font = [UIFont boldSystemFontOfSize:15];
label.textAlignment = NSTextAlignmentCenter;
label.textColor = [UIColor whiteColor];
label.backgroundColor = HexColor(@"#62C067");

// 设置圆角(老方法)
label.layer.cornerRadius = 3;
label.layer.masksToBounds = YES;

[self.view addSubview:label];
201712 更新:优化设置 (参考 iOS 常用组件 - 高效切圆角方法总结):
UILabel *label = [[UILabel alloc] init];
label.frame = CGRectMake(15, 100, 55, 25);
label.text = @"影城卡";
label.font = [UIFont boldSystemFontOfSize:15];
label.textAlignment = NSTextAlignmentCenter;
label.textColor = [UIColor whiteColor];

// 💡💡💡优化设置圆角(推荐方法)💡💡💡
// 设置 layer 的背景颜色,这样就可以避免离屏渲染问题
label.layer.backgroundColor = UIColorHex(62C067).CGColor;
label.layer.cornerRadius = 3;

[self.view addSubview:label];
设置圆角和边框
// 创建 UILabel 对象
UILabel *label = [[UILabel alloc] init];
label.frame = CGRectMake(15, 100, 54, 25);
label.text = @"小食";
label.font = [UIFont systemFontOfSize:15];
label.textAlignment = NSTextAlignmentCenter;
label.textColor = [UIColor flatSkyBlueColor];
// 设置圆角
label.layer.cornerRadius = 12;
label.layer.masksToBounds = YES;
// 设置边框
label.layer.borderWidth = 1.0;
label.layer.borderColor = [UIColor flatSkyBlueColor].CGColor;
[self.view addSubview:label];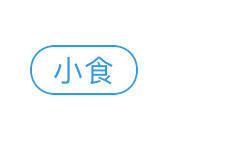
设置 attributedText
// 创建 UILabel 对象
UILabel *label = [[UILabel alloc] init];

// 设置 attributedText
NSString *string = @"25.8元起";
NSMutableAttributedString *attributedString = [[NSMutableAttributedString alloc] initWithString:string];
UIFont *font = [UIFont systemFontOfSize:15];
NSDictionary *attributes1 = @{
                             NSForegroundColorAttributeName:HexColor(@"#FF4359"),
                             NSFontAttributeName:font
                             };
[attributedString setAttributes:attributes1 range:NSMakeRange(0, 4)];

NSDictionary *attributes2 = @{
                              NSForegroundColorAttributeName:HexColor(@"#7E7B93"),
                              NSFontAttributeName:font
                              };
[attributedString setAttributes:attributes2 range:NSMakeRange(4, 2)];
label.attributedText = attributedString;

// 限定 label 的宽度和高度,让 label 在此范围内自适应
CGSize size = [label sizeThatFits:CGSizeMake([UIScreen mainScreen].bounds.size.width - 15*2, MAXFLOAT)];
label.frame = CGRectMake(15, 150, size.width, size.height);

[self.view addSubview:label];
设置标题 Tag
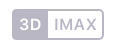
- (void)add3DIMAXTag {

    UIView *tag = [[UIView alloc] initWithFrame:CGRectMake((MaxX(self.titleLabel)+6), MinY(self.titleLabel)+2, 45, 13)];
    tag.backgroundColor = COLOR_RGB(185, 183, 197);
    tag.layer.borderWidth = 1;
    tag.layer.borderColor = COLOR_RGB(185, 183, 197).CGColor;
    tag.layer.cornerRadius = 2;

    UILabel *leftPart = [[UILabel alloc] initWithFrame:CGRectMake(0, 0, 15, 13)];
    leftPart.layer.borderWidth = 1;
    leftPart.layer.borderColor = COLOR_RGB(185, 183, 197).CGColor;
    leftPart.layer.cornerRadius = 2;
    leftPart.backgroundColor = [UIColor clearColor];
    leftPart.text = @"3D";
    leftPart.textAlignment = NSTextAlignmentCenter;
    leftPart.textColor = [UIColor whiteColor];
    leftPart.font = [UIFont systemFontOfSize:6];

    UILabel *rightPart = [[UILabel alloc] initWithFrame:CGRectMake(17, 0, 28, 13)];
    rightPart.backgroundColor = [UIColor whiteColor];
    rightPart.text = @"IMAX";
    rightPart.textAlignment = NSTextAlignmentCenter;
    rightPart.textColor = COLOR_RGB(185, 183, 197);
    rightPart.font = [UIFont systemFontOfSize:6];


    [tag addSubview:leftPart];
    [tag addSubview:rightPart];

    [self.contentView addSubview:tag];
}
设置阴影:
// 设置阴影颜色
label.shadowColor = [UIColor flatBlueColor];

// 设置阴影偏移量,默认为 CGSizeMake(0, -1) ——向上偏移
// CGSize 宽度控制这阴影横向的位移,高度控制着纵向的位移。
label.shadowOffset = CGSizeMake(1.5, 1.5);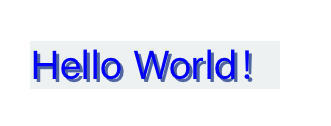
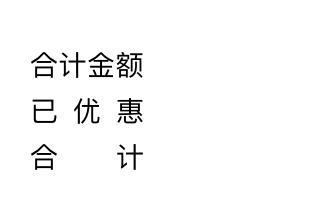
分散对齐标题文字
为 UILabel 添加一个 Category 类:
#import "UILabel+ChangeRightAndLeftAlignment.h"
#import <CoreText/CoreText.h>

@implementation UILabel (ChangeRightAndLeftAlignment)

- (void)hql_changeRightAndLeftAlignment:(CGFloat)labelWidth {
    // 计算文本占据的宽度
    CGSize testSize = [self.text boundingRectWithSize:CGSizeMake(labelWidth, MAXFLOAT) options:NSStringDrawingUsesLineFragmentOrigin | NSStringDrawingTruncatesLastVisibleLine| NSStringDrawingUsesFontLeading attributes:@{NSFontAttributeName :self.font} context:nil].size;

    // 文本之间的距离 = (Label的宽度 - 文本宽度)/ (文字个数 - 1)
    CGFloat margin = (labelWidth - testSize.width)/(self.text.length - 1);
    NSNumber *number = [NSNumber numberWithFloat:margin];
    NSMutableAttributedString *attribute = [[NSMutableAttributedString alloc] initWithString:self.text];

    // 字间距 :NSKernAttributeName
    [attribute addAttribute: NSKernAttributeName value:number range:NSMakeRange(0, self.text.length - 1 )];
    self.attributedText = attribute;
}
💡Tips: 如果标题文字末尾带冒号 (:),而你想让【最后一个字】和【冒号】之间不要有空格 那么上面的代码中
self.text.length - 1这两处应修改为self.text.length - 2,这样就可以排除最后一个间距了。
效果:
给文字添加描边效果
UILabel 自定义文本样式,在文件夹上点击右键,弹出右键菜单,选择添加新文件选项,创建一个以 UILabel 为父类的子类。
NewUILabel.h 文件
#import <UIKit/UIKit.h>

/**
 演示给标签文字,添加描边效果

 在文件夹上点击右键,弹出右键菜单,选择添加新文件选项,创建一个以UILabel为父类的子类
 */
@interface NewUILabel : UILabel

@end
NewUILabel.m 文件
#import "NewUILabel.h"

@implementation NewUILabel

// 首先重载父类的绘图方法,这样就可以从底层自定义标签
// 如果你需要执行自定义绘图,只需要覆盖 drawRect:方法
// 一个空的实现在动画过程中会影响性能。
- (void)drawRect:(CGRect)rect {
    // 获取图形的上下文
    CGContextRef c = UIGraphicsGetCurrentContext();
    // 设置在上下文中,文字的渲染模式为描边模式
    CGContextSetTextDrawingMode(c, kCGTextStroke);

    // 设置文字描边的边框宽度
    CGContextSetLineWidth(c, 2.0);
    // 设置文字描边顶点连接方式
    CGContextSetLineJoin(c, kCGLineJoinRound);
    // 设置文字的描边颜色:白色
    self.textColor = [UIColor whiteColor];
    // 将文字的描边,绘制在指定区域内
    [super drawTextInRect:rect];

    // 设置上下文文字渲染模式为填充
    CGContextSetTextDrawingMode(c, kCGTextFill);
    // 创建一个颜色为黑色的颜色对象
    UIColor *textColor = [UIColor blackColor];
    // 设置文字颜色为黑色
    self.textColor = textColor;
    // 将文字的填充,绘制在指定区域内
    [super drawRect:rect];
}
@end
调用:
// 初始化一个自定义标签对象,并指定其位置和尺寸
CGRect labelFrame = CGRectMake(100, 100, 150, 60);
NewUILabel *label = [[NewUILabel alloc] initWithFrame:labelFrame];
// 设置标签对象的文本内容
label.text = @"Apple";
// 设置文字的字体和大小
label.font = [UIFont fontWithName:@"Arial" size:48];
// 将标签对象,添加到当前视图控制器的根视图
[self.view addSubview:label];

self.view.backgroundColor = [UIColor purpleColor];;
效果:

添加自定义字体包
如果系统提供的标准字体无法满足需求,也可以添加自定义字体包,步骤:
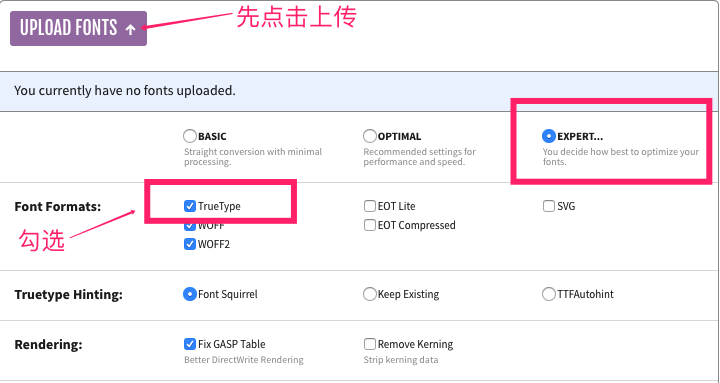
- 拖拽所需要的 .ttf 格式文件的字体(字体查询:https://fonts.google.com)到项目中,如果你的字体包文件是 .otf 格式的,也可以去这个网站上进行转换,先上传 .otf 格式文件,再转换为 TrueType 类型并下载:
Tips:下载的字体可能三种后缀格式,分别为:ttc/ttf/otf:
- TTC 是几个 TTF 合成的字型,例如包含粗体、细体两种字型,TTF 就只有一种字型。
- TTF 是 apple 和微软共同推出的字体文件格式,只有一种字型。
- OTF 是 TTF 的升级版,支持更高级特性的字体。
💡据说 iOS 9 支持了 .otf 格式字体,你可以试试看。
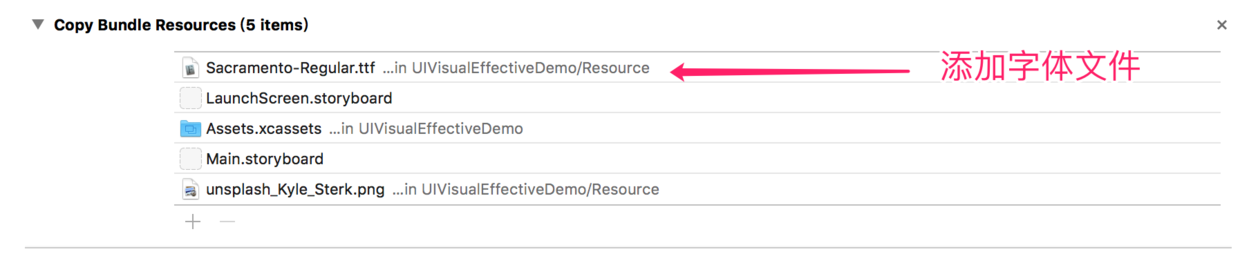
2. 配置 Info.plist 文件,添加 Fonts provided by application 数组字段,将需要的字体包文件名(***.ttf)作为 value 添加到该数组中: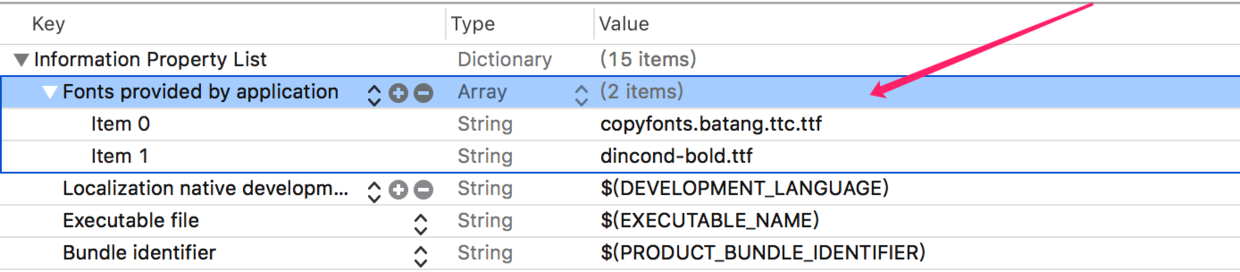
- 将字体文件添加编译,设置 TARGETS -> Build Phases -> Copy Bundle Resources 添加 ***.ttf 字体文件:
![]()
- 使用:
UILabel *label = [[UILabel alloc] init];
label.text = @"Stay Hungry,Stay Foolish.";
label.font = [UIFont fontWithName:@"Sacramento-Regular" size:32.0f];
[label sizeToFit];
label.center = self.view.center;
[self.view addSubview:label];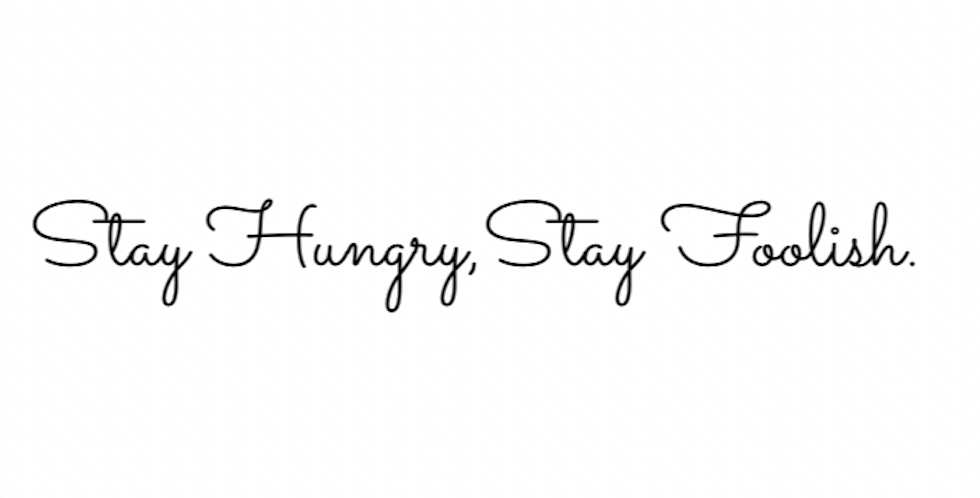
- 如果以上步骤均设置无误,字体效果出不来,可能是
[UIFont fontWithName:@"" size:];方法中的字体名设置不正确(💡因为字体名和字体包的文件名不一定相等!!!),所以你可以用以下方法遍历打印一下字体名看看:
[familyNames enumerateObjectsUsingBlock:^(id  _Nonnull obj, NSUInteger idx, BOOL * _Nonnull stop) {
    NSLog(@"familyNames: %@",(NSString *)obj);
    NSArray *fontNames = [UIFont fontNamesForFamilyName:(NSString *)obj];
    [fontNames enumerateObjectsUsingBlock:^(id  _Nonnull obj, NSUInteger idx, BOOL * _Nonnull stop) {
        NSLog(@"\tfontNames: %@", (NSString *)obj);
    }];
    NSLog(@"--------------------------");
}];
附:不同苹方字体 San Francisco 的 Label 尺寸
测试字体:[UIFont systemFontOfSize:font weight:UIFontWeightRegular]
测试方法:sizeThatFits:
| Font | width | height |
|---|---|---|
| 9 | 9.5 | 11 |
| 10 | 10.5 | 12 |
| 12 | 12.5 | 14.5 |
| 14 | 14.5 | 17 |
| 15 | 15.5 | 18 |
| 16 | 16.5 | 19.5 |
| 17 | 17.5 | 20.5 |
| 18 | 18.5 | 21.5 |
| 19 | 19.5 | 23 |
| 20 | 20.5 | 24 |
| 30 | 30.5 | 36 |
参考:
- 苹果旧金山字体的秘密 @可乐橙
- 表单设计:一页只做一件事 @可乐橙
- 表单设计优化 @可乐橙
- 写一个 iOS 复杂表单的正确姿势
![]()
- UILabel 使用总结
- iOS 常用组件 - 高效切圆角方法总结
- iOS App 导入自定义字体