 on [Unsplash](https://blog-andy0570-1256077835.cos.ap-shanghai.myqcloud.com/site_Images/073509.jpg)](https://blog-andy0570-1256077835.cos.ap-shanghai.myqcloud.com/site_Images/073511.jpg)
1. 获取设备相关信息
UIDevice *device = [[UIDevice alloc] init];
NSString *name = device.name;                   // 获取设备所有者的名称
NSString *model = device.model;                 // 获取设备的型号
NSString *type = device.localizedModel;         // 获取本地化版本
NSString *systemName = device.systemName;       // 获取当前运行的系统
NSString *systemVersion = device.systemVersion; // 获取当前系统的版本
同上
// 获取设备所有者的名称——"My iPhone"
NSString * name = [[UIDevice currentDevice] name];

// 获取设备的型号——@"iPhone"
NSString * model = [[UIDevice currentDevice] model];

// //获取本地化版本
NSString * localizedModel = [[UIDevice currentDevice] localizedModel];

// 获取当前运行的系统名称——@"iOS"
NSString * systemName = [[UIDevice currentDevice] systemName];

// //获取当前系统的版本——@"10.0"、@"11.3.1"
NSString * systemVersion = [[UIDevice currentDevice] systemVersion];
注:
上面获取设备型号的方法
NSString * model = [[UIDevice currentDevice] model];只能获取 @”iPhone” ,想要获取到具体型号(例如 @”iPhone 6s Plus”、@”iPhone 7 (CDMA)”)需要使用下面这个方法:
// 1.需要先导入包
#import <sys/utsname.h>

// 2.获取方法
// 获取设备名称
- (NSString *)deviceModel {
    struct utsname systemInfo;
    uname(&systemInfo);
    NSString *deviceModel = [NSString stringWithCString:systemInfo.machine
                                               encoding:NSUTF8StringEncoding];

    // 模拟器
    if ([deviceModel isEqualToString:@"i386"])         return @"Simulator";
    if ([deviceModel isEqualToString:@"x86_64"])       return @"Simulator";

    // iPhone 系列
    if ([deviceModel isEqualToString:@"iPhone1,1"])    return @"iPhone 1G";
    if ([deviceModel isEqualToString:@"iPhone1,2"])    return @"iPhone 3G";
    if ([deviceModel isEqualToString:@"iPhone2,1"])    return @"iPhone 3GS";
    if ([deviceModel isEqualToString:@"iPhone3,1"])    return @"iPhone 4 (GSM)";
    if ([deviceModel isEqualToString:@"iPhone3,2"])    return @"Verizon iPhone 4";
    if ([deviceModel isEqualToString:@"iPhone3,3"])    return @"iPhone 4 (CDMA/Verizon/Sprint)";
    if ([deviceModel isEqualToString:@"iPhone4,1"])    return @"iPhone 4S";
    if ([deviceModel isEqualToString:@"iPhone5,1"])    return @"iPhone 5";
    if ([deviceModel isEqualToString:@"iPhone5,2"])    return @"iPhone 5";
    if ([deviceModel isEqualToString:@"iPhone5,3"])    return @"iPhone 5C";
    if ([deviceModel isEqualToString:@"iPhone5,4"])    return @"iPhone 5C";
    if ([deviceModel isEqualToString:@"iPhone6,1"])    return @"iPhone 5S";
    if ([deviceModel isEqualToString:@"iPhone6,2"])    return @"iPhone 5S";
    if ([deviceModel isEqualToString:@"iPhone7,1"])    return @"iPhone 6 Plus";
    if ([deviceModel isEqualToString:@"iPhone7,2"])    return @"iPhone 6";
    if ([deviceModel isEqualToString:@"iPhone8,1"])    return @"iPhone 6s";
    if ([deviceModel isEqualToString:@"iPhone8,2"])    return @"iPhone 6s Plus";
    if ([deviceModel isEqualToString:@"iPhone8,4"])    return @"iPhone SE";
    if ([deviceModel isEqualToString:@"iPhone9,1"])    return @"iPhone 7 (CDMA)";
    if ([deviceModel isEqualToString:@"iPhone9,3"])    return @"iPhone 7 (GSM)";
    if ([deviceModel isEqualToString:@"iPhone9,2"])    return @"iPhone 7 Plus (CDMA)";
    if ([deviceModel isEqualToString:@"iPhone9,4"])    return @"iPhone 7 Plus (GSM)";
    if ([deviceModel isEqualToString:@"iPhone10,1"])    return @"iPhone 8 (CDMA)";
    if ([deviceModel isEqualToString:@"iPhone10,4"])    return @"iPhone 8 (GSM)";
    if ([deviceModel isEqualToString:@"iPhone10,2"])    return @"iPhone 8 Plus (CDMA)";
    if ([deviceModel isEqualToString:@"iPhone10,5"])    return @"iPhone 8 Plus (GSM)";
    if ([deviceModel isEqualToString:@"iPhone10,3"])    return @"iPhone X (CDMA)";
    if ([deviceModel isEqualToString:@"iPhone10,6"])    return @"iPhone X (GSM)";

    // iPod 系列
    if ([deviceModel isEqualToString:@"iPod1,1"])      return @"iPod Touch 1G";
    if ([deviceModel isEqualToString:@"iPod2,1"])      return @"iPod Touch 2G";
    if ([deviceModel isEqualToString:@"iPod3,1"])      return @"iPod Touch 3G";
    if ([deviceModel isEqualToString:@"iPod4,1"])      return @"iPod Touch 4G";
    if ([deviceModel isEqualToString:@"iPod5,1"])      return @"iPod Touch 5G";
    if ([deviceModel isEqualToString:@"iPod7,1"])      return @"iPod Touch 6G";

    // iPad 系列
    if ([deviceModel isEqualToString:@"iPad1,1"])      return @"iPad";
    if ([deviceModel isEqualToString:@"iPad1,2"])      return @"iPad 3G";

    if ([deviceModel isEqualToString:@"iPad2,1"])      return @"iPad 2 (WiFi)";
    if ([deviceModel isEqualToString:@"iPad2,2"])      return @"iPad 2 (GSM)";
    if ([deviceModel isEqualToString:@"iPad2,3"])      return @"iPad 2 (CDMA)";
    if ([deviceModel isEqualToString:@"iPad2,4"])      return @"iPad 2 (32nm)";
    if ([deviceModel isEqualToString:@"iPad2,5"])      return @"iPad Mini (WiFi)";
    if ([deviceModel isEqualToString:@"iPad2,6"])      return @"iPad Mini (GSM)";
    if ([deviceModel isEqualToString:@"iPad2,7"])      return @"iPad Mini (CDMA)";

    if ([deviceModel isEqualToString:@"iPad3,1"])      return @"iPad 3(WiFi)";
    if ([deviceModel isEqualToString:@"iPad3,2"])      return @"iPad 3(CDMA)";
    if ([deviceModel isEqualToString:@"iPad3,3"])      return @"iPad 3(4G)";
    if ([deviceModel isEqualToString:@"iPad3,4"])      return @"iPad 4 (WiFi)";
    if ([deviceModel isEqualToString:@"iPad3,5"])      return @"iPad 4 (4G)";
    if ([deviceModel isEqualToString:@"iPad3,6"])      return @"iPad 4 (CDMA)";

    if ([deviceModel isEqualToString:@"iPad4,1"])      return @"iPad Air";
    if ([deviceModel isEqualToString:@"iPad4,2"])      return @"iPad Air";
    if ([deviceModel isEqualToString:@"iPad4,3"])      return @"iPad Air";
    if ([deviceModel isEqualToString:@"iPad4,4"])      return @"iPad Mini 2";
    if ([deviceModel isEqualToString:@"iPad4,5"])      return @"iPad Mini 2";
    if ([deviceModel isEqualToString:@"iPad4,6"])      return @"iPad Mini 2";
    if ([deviceModel isEqualToString:@"iPad4,7"])      return @"iPad Mini 3";
    if ([deviceModel isEqualToString:@"iPad4,8"])      return @"iPad Mini 3";
    if ([deviceModel isEqualToString:@"iPad4,9"])      return @"iPad Mini 3";

    if ([deviceModel isEqualToString:@"iPad5,1"])      return @"iPad Mini 4";
    if ([deviceModel isEqualToString:@"iPad5,2"])      return @"iPad Mini 4";
    if ([deviceModel isEqualToString:@"iPad5,3"])      return @"iPad Air 2";
    if ([deviceModel isEqualToString:@"iPad5,4"])      return @"iPad Air 2";

    if ([deviceModel isEqualToString:@"iPad6,3"])      return @"iPad PRO (12.9)";
    if ([deviceModel isEqualToString:@"iPad6,4"])      return @"iPad PRO (12.9)";
    if ([deviceModel isEqualToString:@"iPad6,7"])      return @"iPad PRO (9.7)";
    if ([deviceModel isEqualToString:@"iPad6,8"])      return @"iPad PRO (9.7)";
    if ([deviceModel isEqualToString:@"iPad6,11"])      return @"iPad 5";
    if ([deviceModel isEqualToString:@"iPad6,12"])      return @"iPad 5";

    if ([deviceModel isEqualToString:@"iPad7,1"])      return @"iPad PRO 2 (12.9)";
    if ([deviceModel isEqualToString:@"iPad7,2"])      return @"iPad PRO 2 (12.9)";
    if ([deviceModel isEqualToString:@"iPad7,3"])      return @"iPad PRO (10.5)";
    if ([deviceModel isEqualToString:@"iPad7,4"])      return @"iPad PRO (10.5)";

    return deviceModel;
}

// 3.使用方法
// 获取移动设备名称
NSString *deviceModel = [self deviceModelName];具体型号和设备名称参考:https://www.theiphonewiki.com/wiki/Models
2. 获取设备唯一标识符 UUID
NSString *UUIDString = [[[UIDevice currentDevice] identifierForVendor] UUIDString]; 注:
这个唯一标识符 UUID 也有点问题,在 iOS 系统升级或者 APP 卸载后重新安装,可能会产生获取到的 UUID 是不同的问题。
科普文: iOS 开发之获取设备唯一标识符
1. 关于 APP 从设备上卸载后重新安装引起 UUID 值改变的问题
stackoverflow 社区中的相关讨论:其中有一条:在 iOS 设备上安装应用程序(或同一供应商的其他应用程序)时,此属性中的值保持不变。 当用户从设备中删除该供应商的所有应用程序,然后重新安装一个或多个应用程序时,该值会更改。
在 Apple API Reference:UIDevice——identifierForVendor中也可以找到这样一段描述:
The value in this property remains the same while the app (or another app from the same vendor) is installed on the iOS device. The value changes when the user deletes all of that vendor’s apps from the device and subsequently reinstalls one or more of them. The value can also change when installing test builds using Xcode or when installing an app on a device using ad-hoc distribution. Therefore, if your app stores the value of this property anywhere, you should gracefully handle situations where the identifier changes.
翻译:在 iOS 设备上安装应用程序(或同一供应商的其他应用程序)时,此属性中的值保持不变。 当用户从设备中删除该供应商的所有应用程序,然后重新安装一个或多个应用程序时,该值会更改。 使用 Xcode 安装测试版本时或使用 ad-hoc 分发在设备上安装应用程序时,该值也可能更改。 因此,如果您的应用程序要在任何位置存储此属性的值,您应该适当地处理标识符会改变的情况。如果用 keychain(钥匙串)来保存 UUID 这个方法:
keychain 顾名思义,是钥匙串的意思,是苹果公司 Mac OS 中的密码管理系统。当使用 UUID 来作为设备的唯一标识时,获取到 UUID 后,如果用 NSUserDefaults 存储,当程序(这里指某一供应商在该设备上的所有应用程序)被卸载后重装时,再获得的 UUID 和之前就不同了。使用 keychain 存储可以保证 APP 被卸载重装时,UUID 不会被删除,还是保存在系统的钥匙串中。所以我们可以将 UUID 存储到 keychain 里面,需要用到的时候从 keychain 中去取,这样可以保证 UUID 的唯一性。但当刷机或者升级系统后,UUID 还是会改变的。
该方法可参考的资料:- SAMKeychain
- iOS 如何获取设备的唯一标识(UUID)@若锦 :Demo:GitHub
- iOS 获取 UUID,并使用 keychain 存储 @wooke
stackoverflow 社区中有人讨论到,如果开启了 iCloud 同步功能(synchronisation ),KeyChain(钥匙串)就会被同步,所有同步的设备也将获得相同的 UUID。
2. 系统升级、还原或者刷机会导致 UUID 变化吗?
目前我得到的答案是:用户还原设备或刷机会导致 KeyChain(钥匙串)数据被删除。系统升级还不知道,没有测过。
stackoverflow 上的讨论:If users upgrade iOS system,will the UUID saved in keyChain also been changed or deleted?
如果你有答案或有相关的解决方法,不妨留言吧。
- 还有一种方法是:使用设备的 mac 地址结合 bundle 标识符生成一个新的散列的唯一标识符。
UIDevice-with-UniqueIdentifier-for-iOS-5, 但是该文档的第一行描述NOTE: this is not going to work under iOS 7看来这个方法估计也是不能用的。 - 参考:iOS 开发之获取设备唯一标识符
3. 为系统创建一个随机标识符
(NSString*) createUUID  {
    NSString *id = [[NSUserDefaults standardUserDefaults] objectForKey:@"UUID"];    //获取标识为"UUID"的值
    if(id == nil)
    {
        if([[[UIDevice currentDevice] systemVersion] floatValue] > 6.0)
        {
            NSString *identifierNumber = [[NSUUID UUID] UUIDString];                //ios 6.0 之后可以使用的api
            [[NSUserDefaults standardUserDefaults] setObject:identifierNumber forKey:@"UUID"];  //保存为UUID
            [[NSUserDefaults standardUserDefaults] synchronize];
        }
        else{
            CFUUIDRef uuid = CFUUIDCreate(NULL);
            CFStringRef uuidString = CFUUIDCreateString(NULL, uuid);                    //ios6.0之前使用的api
            NSString *identifierNumber = [NSString stringWithFormat:@"%@", uuidString];
            [[NSUserDefaults standardUserDefaults] setObject:identifierNumber forKey:@"UUID"];
            [[NSUserDefaults standardUserDefaults] synchronize];
            CFRelease(uuidString);
            CFRelease(uuid);
        }
        return [[NSUserDefaults standardUserDefaults] objectForKey@"UUID"];
    }
    return id;
}
4. 获取当前屏幕分辨率的信息
CGRect rect = [[UIScreen mainScreen] bounds];
CGFloat scale = [[UIScreen mainScreen].scale];
CGFloat width = rect.size.width * scale;
CGFloat height = rect.size.height * scale;
5. 获取运营商信息
需要先导入头文件
#import <CoreTelephony/CTCarrier.h>
#import <CoreTelephony/CTTelephonyNetworkInfo.h>
创建对象
CCTelephonyNetworkInfo *info = [[CTTelephonyNetworkInfo alloc] init];获取运行商的名称
CTCarrier *carrier = [info subscriberCellularProvider];
NSString *mCarrier = [NSString stringWithFormat:@"%@",[carrier carrierName]];
6. 获取当前网络类型
iOS 7 之后可以按照以下方式获取。方便而且类型多
NSString *mConnectType = [[NSString alloc] initWithFormat:@"%@",info.currentRadioAccessTechnology];类型有以下:
CTRadioAccessTechnologyGPRS         //介于2G和3G之间,也叫2.5G ,过度技术
CTRadioAccessTechnologyEdge         //EDGE为GPRS到第三代移动通信的过渡,EDGE俗称2.75G
CTRadioAccessTechnologyWCDMA
CTRadioAccessTechnologyHSDPA           //亦称为3.5G(3?G)
CTRadioAccessTechnologyHSUPA           //3G到4G的过度技术
CTRadioAccessTechnologyCDMA1x          //3G
CTRadioAccessTechnologyCDMAEVDORev0    //3G标准
CTRadioAccessTechnologyCDMAEVDORevA
CTRadioAccessTechnologyCDMAEVDORevB
CTRadioAccessTechnologyeHRPD        //电信使用的一种3G到4G的演进技术, 3.75G
CTRadioAccessTechnologyLTE          //接近4G
注:
如果你使用 AFNetworking框架的话,该框架中有一个检测网络状态的方法:
#pragma mark 网络状态监测
- (void)initNetworkReachabilityManager {
    AFNetworkReachabilityManager *networkReachabilityManager = [AFNetworkReachabilityManager sharedManager];
    [networkReachabilityManager setReachabilityStatusChangeBlock:^(AFNetworkReachabilityStatus status) {
        switch (status) {
            case AFNetworkReachabilityStatusUnknown:
                NSLog(@"网络状态检测:未知");
                break;
            case AFNetworkReachabilityStatusNotReachable:
                NSLog(@"网络状态检测:没有网络");
                break;
            case AFNetworkReachabilityStatusReachableViaWWAN:
                NSLog(@"网络状态检测:3G网络");
                break;
            case AFNetworkReachabilityStatusReachableViaWiFi:
                NSLog(@"网络状态检测:WiFi");
                break;
            default:
                break;
        }
    }];
    // 开启
    [networkReachabilityManager startMonitoring];
}
封装了这个方法以后在 viewController.m 的 - (void)viewDidLoad 方法中调用:
// 检测网络状态
[self checkServerState];
7. 获取当前信号强弱
这个貌似没有给出官方的 api,但是网上有人说可以用私有的 api 实现,但是通不过 appStore 的审核,方法如下:
利用 linux 下动态库显式调用 api 的函数。先包含头文件 #import <dlfcn.h>
(int) getSignalLevel  {
//获取库句柄
voidvoid *libHandle = dlopen("/System/Library/Frameworks/CoreTelephony.framework/CoreTelephony",RTLD_LAZY);
//定义一个与将要获取的函数匹配的函数指针
int (*CTGetSignalStrength)();
//获取指定名称的函数
CTGetSignalStrength = (int(*)())dlsym(libHandle,"CTGetSignalStrength");

if(CTGetSignalStrength == NULL)
    return -1;
else{
    int level = CTGetSignalStrength();
    dlclose(libHandle); //切记关闭库
    return level
    }
}
8. 播放系统声音、提醒声音和振动设备
- 需要加入
AudioToolbox.framework框架 - 然后导入头文件
#import <AudioToolbox/AudioToolbox.h> - 在需要震动的地方添加代码:
// 播放系统声音
AudioServicesPlaySystemSound(1005);

// 播放提醒声音
AudioServicesPlayAlertSound(1006);

// 执行震动
AudioServicesPlaySystemSound ( kSystemSoundID_Vibrate) ;
但是貌似这个执行震动不支持传入震动时间和模式,自己去控制吧。
附:声音文件列表参考:wiki: AudioServices
9. 获取电池相关信息
@implementation BatterMonitor
//获取电池当前的状态,共有4种状态
-(NSString*) getBatteryState {
    UIDevice *device = [UIDevice currentDevice];
    if (device.batteryState == UIDeviceBatteryStateUnknown) {
        return @"UnKnow";
    }else if (device.batteryState == UIDeviceBatteryStateUnplugged){
        return @"Unplugged";
    }else if (device.batteryState == UIDeviceBatteryStateCharging){
        return @"Charging";
    }else if (device.batteryState == UIDeviceBatteryStateFull){
        return @"Full";
    }
    return nil;
}

//获取电量的等级,0.00~1.00
-(float) getBatteryLevel {
    return [UIDevice currentDevice].batteryLevel;
}

-(void) getBatteryInfo  {
    NSString *state = getBatteryState();
    float level = getBatteryLevel()*100.0;
    //yourControlFunc(state, level);  //写自己要实现的获取电量信息后怎么处理
}

//打开对电量和电池状态的监控,类似定时器的功能
-(void) didLoad  {
    [[UIDevice currentDevice] setBatteryMonitoringEnable:YES];
    [[NSNotificationCenter defaultCenter] addObserver:self selector:@selector(getBatteryInfo:) name:UIDeviceBatteryStateDidChangeNotification object:nil];
    [[NSNotificationCenter defaultCenter] addObserver:self selector:@selector(getBatteryInfo:) name:UIDeviceBatteryLevelDidChangeNotification object:nil];
    [NSTimer scheduledTimerWithTimeInterval:0.5f target:self selector:@selector(getBatteryInfo:) userInfo:nil repeats:YES];
}
@end
10. 获取 APP 相关的信息
NSDictionary *infoDic = [[NSBundle mainBundle] infoDictionary];

// 获取当前APP版本号,本地程序版本号
NSString *appVersion = [infoDic objectForKey:@"CFBundleShortVersionString"];

// 获取App的build版本
NSString *appBuildVersion = [infoDic objectForKey:@"CFBundleVersion"];

// 获取App的名称
NSString *appName = [infoDic objectForKey:@"CFBundleDisplayName"];

// ******************************
// 以下四个获取方法摘自 YYCategories:
- (NSString *)appBundleName {
    return [[NSBundle mainBundle] objectForInfoDictionaryKey:@"CFBundleName"];
}

- (NSString *)appBundleID {
    return [[NSBundle mainBundle] objectForInfoDictionaryKey:@"CFBundleIdentifier"];
}

- (NSString *)appVersion {
    return [[NSBundle mainBundle] objectForInfoDictionaryKey:@"CFBundleShortVersionString"];
}

- (NSString *)appBuildVersion {
    return [[NSBundle mainBundle] objectForInfoDictionaryKey:@"CFBundleVersion"];
}
11. 获取设备 IP 地址
某天服务器端的同学跑来说想获取并记录移动端的 IP 地址,非要在每一个请求 Dictionary 里再多放一个 IP 地址,于是 Internet 上找到了这个解决方法,(NSDictionary *)getIPAddresses 可以返回一个 Dictionary, 里面记录着有关 IP 地址的所有信息:
Simulator 的 Log: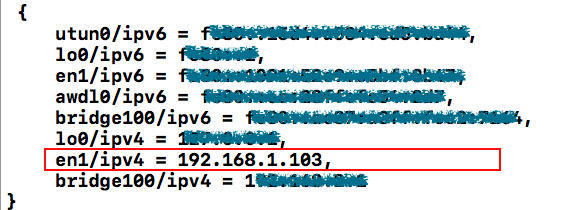
iPhone 的 Log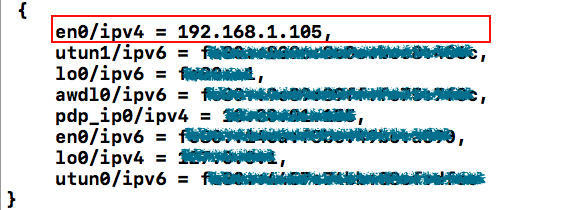
可以再通过:NSString *IP = [dict objectForKey:@"en0/ipv4"]; 来取得所需的 IP 地址,问题就在于 Simulator 中对应 IP 地址的 Key 和 iPhone 中对应 IP 地址的 Key 是不同的,正在纠结的时候 Leader 说获得 IP 地址完全没有必要让移动端的额外给,服务器本身是有方法获得这个 IP 地址的。。。吭哧吭哧忙活了半天原来咱白干了,好吧,删代码。。。等一下,先保存下吧!
好了,这是一段保存下来的有作用但是没有必要写的代码:
// 需要导入的包
#import "HQLGetIPAddress.h"
#import <ifaddrs.h>
#import <arpa/inet.h>
#import <net/if.h>

// 宏定义
#define IOS_CELLULAR    @"pdp_ip0"
#define IOS_WIFI        @"en0"
//#define IOS_VPN       @"utun0"
#define IP_ADDR_IPv4    @"ipv4"
#define IP_ADDR_IPv6    @"ipv6"

#pragma mark - 获取设备当前网络IP地址

- (NSString *)getIPAddress:(BOOL)preferIPv4
{
    NSArray *searchArray = preferIPv4 ?
    @[ /*IOS_VPN @"/" IP_ADDR_IPv4, IOS_VPN @"/" IP_ADDR_IPv6,*/ IOS_WIFI @"/" IP_ADDR_IPv4, IOS_WIFI @"/" IP_ADDR_IPv6, IOS_CELLULAR @"/" IP_ADDR_IPv4, IOS_CELLULAR @"/" IP_ADDR_IPv6 ] :
    @[ /*IOS_VPN @"/" IP_ADDR_IPv6, IOS_VPN @"/" IP_ADDR_IPv4,*/ IOS_WIFI @"/" IP_ADDR_IPv6, IOS_WIFI @"/" IP_ADDR_IPv4, IOS_CELLULAR @"/" IP_ADDR_IPv6, IOS_CELLULAR @"/" IP_ADDR_IPv4 ] ;

    NSDictionary *addresses = [self getIPAddresses];
    NSLog(@"addresses: %@", addresses);

    __block NSString *address;
    [searchArray enumerateObjectsUsingBlock:^(NSString *key, NSUInteger idx, BOOL *stop)
     {
         address = addresses[key];
         if(address) *stop = YES;
     } ];
    return address ? address : @"0.0.0.0";
}

//获取所有相关IP信息
- (NSDictionary *)getIPAddresses
{
    NSMutableDictionary *addresses = [NSMutableDictionary dictionaryWithCapacity:8];

    // retrieve the current interfaces - returns 0 on success
    struct ifaddrs *interfaces;
    if(!getifaddrs(&interfaces)) {
        // Loop through linked list of interfaces
        struct ifaddrs *interface;
        for(interface=interfaces; interface; interface=interface->ifa_next) {
            if(!(interface->ifa_flags & IFF_UP) /* || (interface->ifa_flags & IFF_LOOPBACK) */ ) {
                continue; // deeply nested code harder to read
            }
            const struct sockaddr_in *addr = (const struct sockaddr_in*)interface->ifa_addr;
            char addrBuf[ MAX(INET_ADDRSTRLEN, INET6_ADDRSTRLEN) ];
            if(addr && (addr->sin_family==AF_INET || addr->sin_family==AF_INET6)) {
                NSString *name = [NSString stringWithUTF8String:interface->ifa_name];
                NSString *type;
                if(addr->sin_family == AF_INET) {
                    if(inet_ntop(AF_INET, &addr->sin_addr, addrBuf, INET_ADDRSTRLEN)) {
                        type = IP_ADDR_IPv4;
                    }
                } else {
                    const struct sockaddr_in6 *addr6 = (const struct sockaddr_in6*)interface->ifa_addr;
                    if(inet_ntop(AF_INET6, &addr6->sin6_addr, addrBuf, INET6_ADDRSTRLEN)) {
                        type = IP_ADDR_IPv6;
                    }
                }
                if(type) {
                    NSString *key = [NSString stringWithFormat:@"%@/%@", name, type];
                    addresses[key] = [NSString stringWithUTF8String:addrBuf];
                }
            }
        }
        // Free memory
        freeifaddrs(interfaces);
    }
    return [addresses count] ? addresses : nil;
}
12. APP 中打开一个网页
这个比较简单,直接用提供的接口 openURL 即可。
// APP中打开一个网页
NSURL *url= [NSURL URLWithString:@"https://www.apple.com"];
if ([[UIApplication sharedApplication] canOpenURL:url]) {
    if (@available(iOS 10.0, *)) {
        [[UIApplication sharedApplication] openURL:url options:@{} completionHandler:^(BOOL success) {
            if (success) {
                // 打开网页成功...
            } else {
                // 打开网页失败...
            }
        }];
    } else {
        [[UIApplication sharedApplication] openURL:url];
    }
}
13. APP 中打开另一个 APP
打开另一个 app 还是可以通过 openURL 来实现。但是要分两种情况。第一种是启动内置的应用,一般的电话,浏览器,短信和邮件可以直接调用并添加参数,譬如:
[[UIApplication sharedApplication] openURL:[NSURL URLWithString:@"tel://10086"]];
[[UIApplication sharedApplication] openURL:[NSURL URLWithString:@"mailto://devprograms@apple.com"]];
[[UIApplication sharedApplication] openURL:[NSURL URLWithString:@"sms://10086"]];
第二种情况是要打开自己开发的 app,这种情况则要为将要打开的 app 注册一个 URL 协议。这个可以在项目的文件 info.plist 中注册。主要操作为:
Step1. 右键,选择 “Add Row”
Step2. Key 值选择 “URL types”
Step3. 打开 “Item 0″, 然后为该 key 增加一个 URL identifier。可以是任何值,但建议用 “反域名”(例如 “com.fcplayer.testHello”)。
Step4. 在 “Item 0” 下再加一行。
Step5. 选择 “URL Schemes” 作为 Key。
Step6. 输入你的 URL 协议名 (例如 “testHello://” 应写做 “testHello”)。如果有必要,你可以在这里加入多个协议。
其实在打开的时候只需要 URL Schemes 即可,URL identifier 是可选项。如果需要传送参数,可以在 URL Schemes:// 添加你的参数,格式和网页开发的传递参数差不多。(又或者 URL Schemes://URL identifier@添加的参数)关键是要和接收参数方定义好处理的方式。然后在需要打开的地方添加代码:
NSString *url = @"URL Schemes的路径"
[[UIApplication sharedApplication] openURL:[NSURL URLWithString:url]];推荐阅读:LSApplicationQueriesSchemes– 关于 info.plist 第三方登录 添加 URL Schemes 白名单
14. App Store 应用分享链接
应用分享链接获取方法:
- 打开 「iTunes」应用;
- 进入 App Store;
- 🔍搜索并找到你的应用;
- 鼠标右击应用 ICON 图标并拷贝链接;
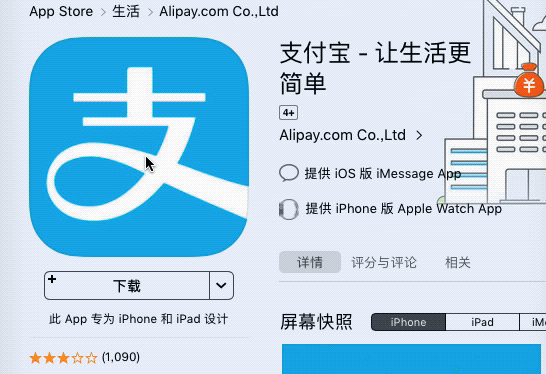
以「支付宝」为例:https://itunes.apple.com/cn/app/ 支付宝 - 让生活更简单 /id333206289?mt=8
然后就可以把这个链接生成二维码,扫一扫下载:
图片来源:pixabay
15. iOS 应用内跳转到 App Store
APP ID 通过类型常量定义好:
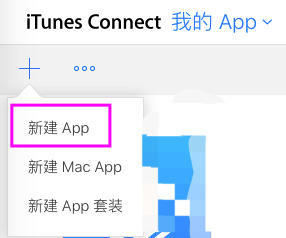
static NSString * const APPID = @"333206289";APP ID 去哪儿找,怎么设置?
在 iTunes Connect 中新建 APP 后,系统会默认分配一个 ID 给你。忘记的话也可以在应用分享链接的 URL 中提取。
一、跳转到「应用详情」页面
NSString *urlStr = [NSString stringWithFormat:@"itms-apps://itunes.apple.com/app/id%@", APPID];
NSURL *url = [NSURL URLWithString:urlStr];
// 跳转之前判断是否可以打开URL
if ([[UIApplication sharedApplication] canOpenURL:url]) {
    if (@available(iOS 10.0, *)) {
        // iOS 10.0 之后使用此方法
        [[UIApplication sharedApplication] openURL:url options:@{} completionHandler:nil];
    }else {
        // iOS 10.0 之前使用此方法
        [[UIApplication sharedApplication] openURL:url];
    }
}
二、跳转到「评论」页面
NSString *urlStr = [NSString stringWithFormat:@"itms-apps://itunes.apple.com/WebObjects/MZStore.woa/wa/viewContentsUserReviews?type=Purple+Software&id=%@&pageNumber=0&sortOrdering=2&mt=8", APPID];
NSURL *url = [NSURL URLWithString:urlStr];
if ([[UIApplication sharedApplication] canOpenURL:url]) {
    if (@available(iOS 10.0, *)) {
        [[UIApplication sharedApplication] openURL:url options:@{} completionHandler:nil];
    }else {
        [[UIApplication sharedApplication] openURL:url];
    }
}
三、跳转到「撰写评论」页面
前两种方法网上已经分享泛滥了,而这个跳转方法很特别哦。
💡💡💡区别:
上面的方法只可以跳转到 App Store 中应用的评论页面,如果用户要评分,步骤是:
- 首先跳转到评论页面;
- 点击「撰写评论」按钮,开始评分。
而这个方法更深入,它可以打开撰写评论页面,用户去评分的步骤是:
- 直接跳转到「撰写评论」页面评分。
// iOS11 之后,以下链接已失效
NSString *urlStr = [NSString stringWithFormat:@"itms-apps://itunes.apple.com/WebObjects/MZStore.woa/wa/viewContentsUserReviews?type=Purple+Software&id=%@&action=write-review",APPID];
[[UIApplication sharedApplication] openURL:[NSURL URLWithString:urlStr]]

// 今天没事点了点App里的评论功能,发现显示“无法连接到App Store”,修复更换的URL如下(更新时间:2018年3月16日)
NSString *urlStr = [NSString stringWithFormat:@"itms-apps://itunes.apple.com/cn/app/id%@?mt=8&action=write-review",APPID];
NSURL *url = [NSURL URLWithString:urlStr];
if ([[UIApplication sharedApplication] canOpenURL:url]) {
    if (@available(iOS 10.0, *)) {
        [[UIApplication sharedApplication] openURL:url options:@{} completionHandler:nil];
    }else {
        [[UIApplication sharedApplication] openURL:url];
    }
}
注意到这两个 URL 地址是不同的,以「微信」示例:
- 评论页面 URL:https://itunes.apple.com/WebObjects/MZStore.woa/wa/viewContentsUserReviews?type=Purple+Software&id=414478124&pageNumber=0&sortOrdering=2&mt=8
- 撰写批评 URL(已失效):
https://itunes.apple.com/WebObjects/MZStore.woa/wa/viewContentsUserReviews?type=Purple+Software&id=414478124&action=write-review - 2018,新的撰写批评 URL:
itms-apps://itunes.apple.com/cn/app/id414478124?mt=8&action=write-review
参考:iOS 11 适配之跳转 App Store 评论
「微信」的去评分跳转到 App Store 就是这个效果:

16. 应用内跳转到系统设置
// 跳转到系统设置中本应用设置下,iOS 8.0 之后有效
if (SYSTEM_VERSION_GREATER_THAN_OR_EQUAL_TO(@"8.0")) {

    NSURL *url = [NSURL URLWithString:UIApplicationOpenSettingsURLString];
    // 跳转之前先判断是否能打开URL
    if ([[UIApplication sharedApplication] canOpenURL:url]) {
        if (@available(iOS 10.0, *)) {
            [[UIApplication sharedApplication] openURL:url options:@{} completionHandler:nil];
        } else {
            [[UIApplication sharedApplication] openURL:url];
        }
    }
}
17. 版本更新提示
需求:每当新版本发布时,首页弹窗提示。
流程图: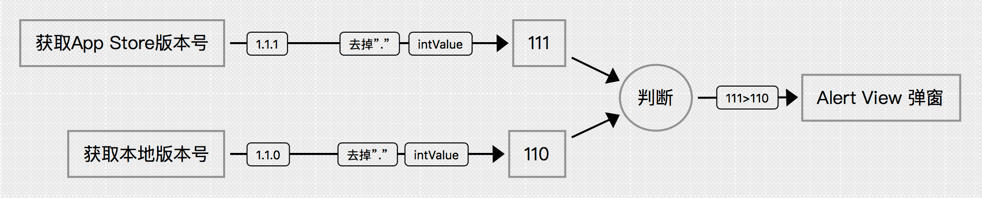
// 检查版本更新
- (void)requestVersionFromAppStore {
    // 使用 YTKNetwork 发起 POST 请求
    // URL:https://itunes.apple.com/cn/lookup?id=836500024
    HQLURL_Check_Version *api = [[HQLURL_Check_Version alloc] init];
    [api startWithCompletionBlockWithSuccess:^(__kindof YTKBaseRequest * _Nonnull request) {
        // App Store 版本号
        NSString *version = [(NSDictionary *)[(NSArray *)request.responseObject[@"results"] lastObject] objectForKey:@"version"];
        [self checkVersionUpdate:version];

    } failure:^(__kindof YTKBaseRequest * _Nonnull request) {
        // error...
    }];
}

- (void)checkVersionUpdate:(NSString *)version {
    // App Store 版本号
    NSString *formatAppStoreVersion = [version stringByReplacingOccurrencesOfString:@"." withString:@""];

    // 本地程序版本号
    NSString *localVersion = [[[NSBundle mainBundle] infoDictionary] objectForKey:@"CFBundleShortVersionString"];
    NSString *formatLocalVersion = [localVersion stringByReplacingOccurrencesOfString:@"." withString:@""];

    BOOL shouldUpdate = [formatAppStoreVersion unsignedIntValue] > [formatLocalVersion unsignedIntValue];
    if (!shouldUpdate) {
        return;
    }

    // 弹窗提示,使用 SCLAlertView-Objective-C 框架
    SCLAlertView *alert = [[SCLAlertView alloc] initWithNewWindow];
    alert.horizontalButtons = YES;
    alert.shouldDismissOnTapOutside = YES;

    // 拒绝按钮
    SCLButton *button = [alert addButton:@"残忍拒绝" actionBlock:nil];
    button.buttonFormatBlock = ^NSDictionary *{
        NSMutableDictionary *buttonConfig = [[NSMutableDictionary alloc] init];
        buttonConfig[@"backgroundColor"] = [UIColor whiteColor];
        buttonConfig[@"textColor"] = HexColor(@"0x2866BF");
        return buttonConfig;
    };

    // 下载按钮
    [alert addButton:@"前往下载" actionBlock:^{
        NSString *urlStr = [NSString stringWithFormat:@"itms-apps://itunes.apple.com/app/id836500024"];
        [[UIApplication sharedApplication] openURL:[NSURL URLWithString:urlStr]];
    }];
    [alert showInfo:self title:@"发现新版本" subTitle:@"您有新的版本可供下载" closeButtonTitle:nil duration:0.0f];
}
效果: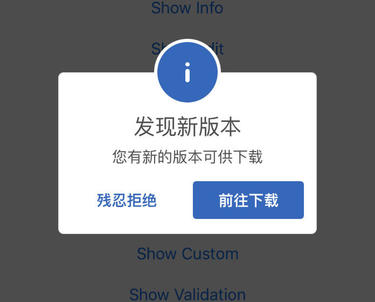
参考
- iOS 如何获取设备的各种信息 @ymwm
- iOS 开发 - 获取设备名称
- iOS 获取设备型号和 App 版本号等信息(OC+Swift)
- iOS 如何获取设备的唯一标识(UUID)
- iOS 获取 UUID,并使用 keychain 存储 @wooke
- iOS 获取设备 IP 地址 @月光下的夜曲
- iOS 开发:获取设备 IP 地址 @高晓牛
- 史上最全的 iOS 各种设备信息获取总结 (iPhone8/iPhone X 已更新)
- How to get device make and model on iOS? @stackoverflow
- http://pdadb.net