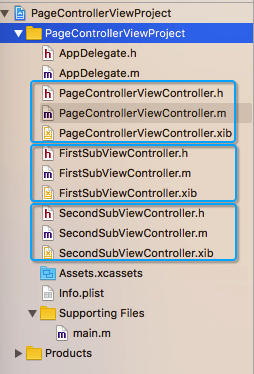
目录结构

PageControllerViewController
PageControllerViewController 的父类是 UIViewController,它是一个容器视图控制器,用于处理两个子视图之间的切换
FirstSubViewController
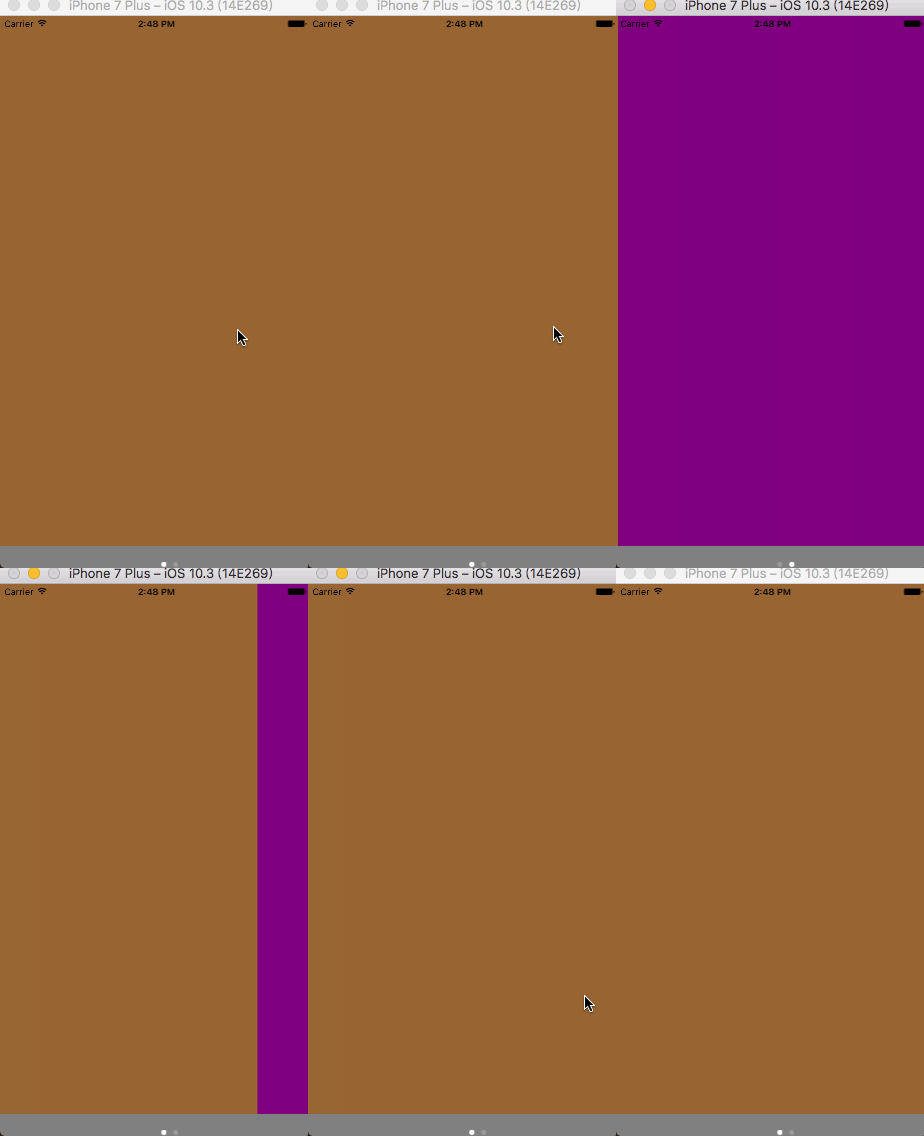
FirstSubViewController 的父类也是 UIViewController,褐色子视图。
SecondSubViewController
SecondSubViewController 的父类也是 UIViewController,紫色子视图。

各模块代码:
两个子视图只是简单地设置了一下背景颜色方便识别
FirstSubViewController.m 文件
<!–hexoPostRenderEscape:
#import "FirstSubViewController.h"
@interface FirstSubViewController ()
@end
@implementation FirstSubViewController
// 设置视图的背景颜色为褐色
- (instancetype)initWithNibName:(NSString *)nibNameOrNil bundle:(NSBundle *)nibBundleOrNil {
self = [super initWithNibName:nibNameOrNil bundle:nibBundleOrNil];
if (self) { self.view.backgroundColor = [UIColor brownColor];
}
return self;
}
@end:hexoPostRenderEscape–>
SecondSubViewController.m 文件
<!–hexoPostRenderEscape:
#import "SecondSubViewController.h"
@interface SecondSubViewController ()
@end
@implementation SecondSubViewController
// 设置视图的背景颜色为紫色
- (instancetype)initWithNibName:(NSString *)nibNameOrNil bundle:(NSBundle *)nibBundleOrNil {
self = [super initWithNibName:nibNameOrNil bundle:nibBundleOrNil];
if (self) { self.view.backgroundColor = [UIColor purpleColor];
}
return self;
}
@end:hexoPostRenderEscape–>
AppDelegate 中设置了程序的入口
- AppDelegate.m 文件
#import "AppDelegate.h"
#import "PageControllerViewController.h"
#import "FirstSubViewController.h"

@interface AppDelegate ()

@property (nonatomic, strong) PageControllerViewController *viewController;

@end

@implementation AppDelegate


- (BOOL)application:(UIApplication *)application didFinishLaunchingWithOptions:(NSDictionary *)launchOptions {

    self.window = [[UIWindow alloc] initWithFrame:[[UIScreen mainScreen] bounds]];

    // 创建程序的入口
    self.viewController = [[PageControllerViewController alloc] initWithNibName:NSStringFromClass([PageControllerViewController class]) bundle:nil];
    self.window.rootViewController = _viewController;

    self.window.backgroundColor = [UIColor whiteColor];
    [self.window makeKeyAndVisible];

    return YES;
}

@end
PageControllerViewController
重点在这里
PageControllerViewController.h 文件
<!–hexoPostRenderEscape:
#import <UIKit/UIKit.h>
#import "FirstSubViewController.h"
#import "SecondSubViewController.h"
@interface PageControllerViewController : UIViewController <UIScrollViewDelegate>
@property (nonatomic) FirstSubViewController *firstSubViewController;
@property (nonatomic) SecondSubViewController *secondSubViewController;
/**
 控制翻页的属性,使用它来控制滚动视图的翻页。通过该组件中的小白点,来观察当前页面的位置
 */
@property (nonatomic) UIPageControl *uiPageController;
// 滚动视图属性
@property (nonatomic) UIScrollView *uiscrollerView;
/**
 状态属性,用来标志页面拖动状态。
 */
@property (nonatomic) BOOL isPageControlUsed;
@end:hexoPostRenderEscape–>
PageControllerViewController.m 文件
<!–hexoPostRenderEscape:
#import "PageControllerViewController.h"
@interface PageControllerViewController ()
@end
@implementation PageControllerViewController
(void)viewDidLoad {
[super viewDidLoad];
// 首先获取当前屏幕的尺寸
CGRect screenFrame = [[UIScreen mainScreen] bounds];
// 然后获得屏幕尺寸的宽度
int screenWidth = screenFrame.size.width;
// 再获得屏幕尺寸的高度值,并加上顶部状态栏高度
int screenHeight = screenFrame.size.height + 20;
// 创建一个区域,来显示之前创建的视图控制器
screenFrame = CGRectMake(0, 0, screenWidth, screenHeight);
// 初始换滚动视图对象,并设置滚动视图的尺寸信息
_uiscrollerView = [[UIScrollView alloc] initWithFrame:screenFrame];
// 设置滚动视图为分页模式,即每滚动一次就是一页
_uiscrollerView.pagingEnabled = YES;
// 我们有两个页面,所以将滚动视图的“取景范围”的宽度,设置为两倍页面宽度
_uiscrollerView.contentSize = CGSizeMake(screenWidth * 2, screenHeight);
// 设置滚动视图的背景色为黑色
_uiscrollerView.backgroundColor = [UIColor blackColor];
// 设置滚动视图对象的代理为当前类,这样就可以在当前文件中,编写代理方法,以捕捉滚动视图的相关动作
_uiscrollerView.delegate = self;
// 接着创建一个区域,显示页面控制器对象
int pcHeight = 50;
// 设置页面控制器对象的显示区域
CGRect rect = CGRectMake(0, screenHeight - pcHeight, screenWidth, pcHeight);
// 初始化页面控制器对象
_uiPageController = [[UIPageControl alloc] initWithFrame:rect];
// 设置总页数
_uiPageController.numberOfPages = 2;
// 设置当前页编号
_uiPageController.currentPage = 0;
// 设置页面控制器对象的背景颜色为灰色
_uiPageController.backgroundColor = [UIColor grayColor];
// 给页面控制器对象,添加监听页面切换事件的方法
[_uiPageController addTarget:self
action:@selector(pageControlDidChanged:)
forControlEvents:UIControlEventValueChanged];
// 创建第一个视图控制器对象的实例
_firstSubViewController = [[FirstSubViewController alloc] initWithNibName:NSStringFromClass([FirstSubViewController class]) bundle:nil];
// 设置坐标原点的纵向值为0
screenFrame.origin.y = 0;
// 设置第一个视图控制器对象的显示区域
_firstSubViewController.view.frame = screenFrame;
// 创建第二个视图控制器对象的实例
_secondSubViewController = [[SecondSubViewController alloc] initWithNibName:NSStringFromClass([SecondSubViewController class]) bundle:nil];
// 设置坐标原点的X值为屏幕宽度,即第二个视图控制器对象显示在屏幕之外
screenFrame.origin.x = screenFrame.size.width;
// 设置第二个视图控制器对象的显示区域
_secondSubViewController.view.frame = screenFrame;
// 将两个视图添加到滚动视图对象里
[_uiscrollerView addSubview:_firstSubViewController.view];
[_uiscrollerView addSubview:_secondSubViewController.view];
// 再把滚动视图对象和页面控制器对象,添加到当前窗口的根视图里
[self.view insertSubview:_uiscrollerView atIndex:0];
[self.view insertSubview:_uiPageController atIndex:1];
}
// 创建监听页面切换事件的方法
(void)pageControlDidChanged:(id)sender {
// 获得当前页面控制器对象的显示页码
NSInteger currentPage = _uiPageController.currentPage;
// 获得滚动视图当前显示区域
CGRect frame = _uiscrollerView.frame;
// 根据页面控制器对象的当前页码,计算滚动视图在下一页的显示区域
frame.origin.x = frame.size.width * currentPage;
frame.origin.y = 0;
// 滚动视图到目标位置
[_uiscrollerView scrollRectToVisible:frame animated:YES];
// 设置通过页面控制器对象切换页面
_isPageControlUsed = YES;
}
// 创建监听滚动视图的滚动事件的代理方法
(void)scrollViewDidScroll:(UIScrollView *)scrollView {
// 如果是通过【页面控制器对象切换】,则不执行后面的代码
if (_isPageControlUsed) {
return;
}
// 如果是【手指滑动切换】,要同步当前视图所对应的页面控制器页码值
// 获得滚动视图的宽度值
CGFloat pageWidth = _uiscrollerView.frame.size.width;
// 根据滚动视图的宽度值和横向位移量,计算当前页码
int page = floor((_uiscrollerView.contentOffset.x - pageWidth/2) / pageWidth) + 1;
// 设置页面控制器的显示页码,为通过计算所得的页码
_uiPageController.currentPage = page;
}
// 创建监听滚动视图的滚动减速事件的代理方法。
- (void)scrollViewDidEndDecelerating:(UIScrollView *)scrollView {
// 重置标识变量的默认值
_isPageControlUsed = NO;
}
@end:hexoPostRenderEscape–>
Demo:
