声明:本文参考自高性能 iOS 应用开发 - 高拉夫・瓦依希 第 6 章。
创建复合视图的三种方式:
- 故事版(Storyboard)或者 NIB 文件;
- 手写代码,创建并添加 UI 控件;
- 手写代码,直接绘制视图;
开门见山,我会用以上三种不同的方式创建如下的复合视图(UITableViewCell 实例对象),并加载到 UITableViewController 页面上,同时测试它们各自的性能(耗时、内存占用)。

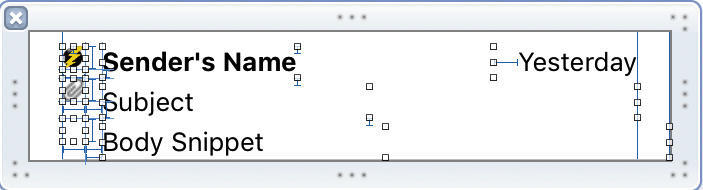
元素:四个 UILabel、两个 UIImage 和一个 UIButton 对象。
从左到右,从上到下依次是:
| 控件 | 说明 |
|---|---|
| UIImage | 邮件状态图片(已读、未读、已回复) |
| UILabel | E-mail 地址 |
| UILabel | 时间 |
| UIImage | 是否有附件的图片📎 |
| UILabel | 邮件主题 |
| UIButton | 选中按钮 |
| UILabel | 邮件摘要 |
一、复合视图(NIB 方式)
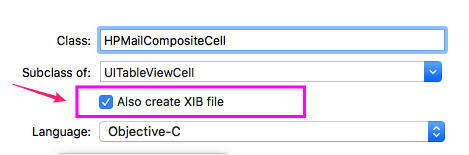
使用 NIB 方式创建复合视图是最简单的方式(特点🤩:速度快、简单可视化),我们需要创建一个继承于 UITableViewCell 的新类:
记得勾选 ☑️Also create XIB file
然后向 NIB 文件中拖拽添加四个 UILabel、两个 UIImage 和一个 UIButton 控件,同时做好自动布局:
二、复合视图(手写代码)
使用手写代码创建复合视图耗时较长(特点✏️:速度慢、但是方便重用),同时我遵循了 MVC 的设计模式,为它创建了一个模型类。
HPMailModel—— 模型类
// HPMailModel.h
#import <Foundation/Foundation.h>

typedef NS_ENUM(NSUInteger, HPMailModelStatus) {
    HPMailModelStatusUnread,
    HPMailModelStatusRead,
    HPMailModelStatusReplied,
};

/**
 邮箱模型
 */
@interface HPMailModel : NSObject

@property (nonatomic, copy, readonly) NSString *email;
@property (nonatomic, copy, readonly) NSString *subject;
@property (nonatomic, copy, readonly) NSString *date;
@property (nonatomic, copy, readonly) NSString *snippet;
@property (nonatomic, assign, readonly) HPMailModelStatus mailStatus;
@property (nonatomic, assign, readonly) BOOL hasAttachment;
@property (nonatomic, assign, readwrite) BOOL isMailSelected;

- (instancetype)initWithEmail:(NSString *)email
                      subject:(NSString *)subject
                         date:(NSString *)date
                      snippet:(NSString *)snippet
                  emailStatus:(HPMailModelStatus)status
                hasAttachment:(BOOL)hasAttachment;

@end

//  HPMailModel.m
// 避免干扰,省略其它代码...
HPMailCompositeHandCell—— 视图类
步骤:
- 创建一个继承于 UITableViewCell 的新类;
- 使用
@property属性创建 UI 控件支持细节; - 在
contentView中添加所需的子视图并做好自动布局; - 渲染数据;
其它说明:
- 所有控件通过 Lazy Loading 方式设置;
- 使用了 Masonry 框架实现自动布局;
//  HPMailCompositeHandCell.h
#import <UIKit/UIKit.h>
@class HPMailModel;

UIKIT_EXTERN const CGFloat HPMailCompositeHandCellHeight;

/**
 复合视图,手写代码
 */
@interface HPMailCompositeHandCell : UITableViewCell

@property (nonatomic, strong) HPMailModel *model;

@end

//  HPMailCompositeHandCell.m
#import "HPMailCompositeHandCell.h"

// Model
#import "HPMailModel.h"

// Utils
#import <Masonry.h>

const CGFloat HPMailCompositeHandCellHeight = 64;

@interface HPMailCompositeHandCell ()

@property (nonatomic, strong) UILabel *emailLabel;
@property (nonatomic, strong) UILabel *subjectLabel;
@property (nonatomic, strong) UILabel *snippetLabel;
@property (nonatomic, strong) UILabel *dateLabel;
@property (nonatomic, strong) UIButton *sectionButton;
@property (nonatomic, strong) UIImageView *statusImageView;
@property (nonatomic, strong) UIImageView *attachmentImageView;

@end

@implementation HPMailCompositeHandCell

#pragma mark - Lifecycle

- (instancetype)initWithStyle:(UITableViewCellStyle)style reuseIdentifier:(NSString *)reuseIdentifier {
    self = [super initWithStyle:style reuseIdentifier:reuseIdentifier];
    if (self) {
        [self addSubviews];
    }
    return self;
}

#pragma mark - Custom Accessors

-(void)setModel:(HPMailModel *)model {
    _model = model;
    [self render];
}

- (UILabel *)emailLabel {
    if (!_emailLabel) {
        _emailLabel = [[UILabel alloc] init];
        _emailLabel.font = [UIFont boldSystemFontOfSize:13.0f];
    }
    return _emailLabel;
}

- (UILabel *)subjectLabel {
    if (!_subjectLabel) {
        _subjectLabel = [[UILabel alloc] init];
        _subjectLabel.font = [UIFont systemFontOfSize:13.0f];
    }
    return _subjectLabel;
}

- (UILabel *)snippetLabel {
    if (!_snippetLabel) {
        _snippetLabel = [[UILabel alloc] init];
        _snippetLabel.font = [UIFont systemFontOfSize:13.0f];
    }
    return _snippetLabel;
}

- (UILabel *)dateLabel {
    if (!_dateLabel) {
        _dateLabel = [[UILabel alloc] init];
        _dateLabel.font = [UIFont systemFontOfSize:13.0f];
    }
    return _dateLabel;
}

- (UIImageView *)statusImageView {
    if (!_statusImageView) {
        _statusImageView = [[UIImageView alloc] init];
    }
    return _statusImageView;
}

- (UIImageView *)attachmentImageView {
    if (!_attachmentImageView) {
        _attachmentImageView = [[UIImageView alloc] init];
    }
    return _attachmentImageView;
}

- (UIButton *)sectionButton {
    if (!_sectionButton) {
        _sectionButton = [UIButton buttonWithType:UIButtonTypeCustom];
        [_sectionButton addTarget:self action:@selector(sectionButtonDidClicked:) forControlEvents:UIControlEventTouchUpInside];
    }
    return _sectionButton;
}

#pragma mark - IBActions

- (void)sectionButtonDidClicked:(id)sender {

}

#pragma mark - Private

- (void)addSubviews {
    [self.contentView addSubview:self.statusImageView];
    [self.contentView addSubview:self.attachmentImageView];
    [self.contentView addSubview:self.sectionButton];
    [self.contentView addSubview:self.emailLabel];
    [self.contentView addSubview:self.subjectLabel];
    [self.contentView addSubview:self.snippetLabel];
    [self.contentView addSubview:self.dateLabel];

    CGSize size = CGSizeMake(12, 12);
    [self.statusImageView mas_makeConstraints:^(MASConstraintMaker *make) {
        make.top.mas_equalTo(self.contentView).with.offset(4);
        make.left.mas_equalTo(self.contentView).with.offset(8);
        make.size.mas_equalTo(size);
    }];
    [self.attachmentImageView mas_makeConstraints:^(MASConstraintMaker *make) {
        make.top.equalTo(self.statusImageView.mas_bottom).with.offset(4);
        make.left.equalTo(self.statusImageView);
        make.size.mas_equalTo(size);
    }];
    [self.sectionButton mas_makeConstraints:^(MASConstraintMaker *make) {
        make.top.equalTo(self.attachmentImageView.mas_bottom).with.offset(4);
        make.left.equalTo(self.statusImageView);
        make.size.mas_equalTo(size);
    }];
    [self.emailLabel mas_makeConstraints:^(MASConstraintMaker *make) {
        make.top.equalTo(self.statusImageView);
        make.left.equalTo(self.statusImageView.mas_right).with.offset(8);
        make.height.mas_equalTo(16);
    }];
    [self.subjectLabel mas_makeConstraints:^(MASConstraintMaker *make) {
        make.top.equalTo(self.emailLabel.mas_bottom).with.offset(8);
        make.left.equalTo(self.emailLabel);
        make.height.mas_equalTo(16);
    }];
    [self.dateLabel mas_makeConstraints:^(MASConstraintMaker *make) {
        make.top.equalTo(self.emailLabel);
        make.right.equalTo(self.contentView);
        make.size.mas_equalTo(CGSizeMake(60, 16));
        make.left.equalTo(self.subjectLabel.mas_right).with.offset(12);
    }];
}

- (void)render {
    self.emailLabel.text = self.model.email;
    self.subjectLabel.text = self.model.subject;
    self.snippetLabel.text = self.model.snippet;
    self.dateLabel.text= self.model.date;

    // 邮箱状态
    UIImage *statusImage = nil;
    switch (self.model.mailStatus) {
        case HPMailModelStatusUnread:
            statusImage = [UIImage imageNamed:@"mail_unread"];
            break;
        case HPMailModelStatusRead:
            statusImage = [UIImage imageNamed:@"mail_read"];
            break;
        case HPMailModelStatusReplied:
            statusImage = [UIImage imageNamed:@"mail_replied"];
            break;
    }
    self.statusImageView.image = statusImage;

    // 是否有附件
    UIImage *attachmentImage = nil;
    if (self.model.hasAttachment) {
        attachmentImage = [UIImage imageNamed:@"mail_attachment"];
    }
    self.attachmentImageView.image = attachmentImage;

    // 选中状态
    UIImage *selectedImage = [UIImage imageNamed:
        (self.model.isMailSelected ? @"mail_selected" : @"mail_unselected")];
    [self.sectionButton setBackgroundImage:selectedImage forState:UIControlStateNormal];
}
三、直接绘制
直接绘制自定义视图的方案参考自 Twitter 的这篇博客:Simple Strategies for Smooth Animation on the iPhone @Twitter Blog
直接绘制自定义视图:
- 创建一个继承于 UITableViewCell 的新类;
- 使用
@property属性支持细节。 - 覆盖
drawRect:方法自定义渲染元素;
HPMailDirectDrawCell—— 视图类
//  HPMailDirectDrawCell.h
#import <UIKit/UIKit.h>

// 邮件状态
typedef NS_ENUM(NSUInteger, HPMailDirectDrawCellStatus) {
    HPMailDirectDrawCellStatusUnread,
    HPMailDirectDrawCellStatusRead,
    HPMailDirectDrawCellStatusReplied,
};

/**
 直接绘制视图
 */
@interface HPMailDirectDrawCell : UITableViewCell

@property (nonatomic, copy) NSString *email;   // 邮箱
@property (nonatomic, copy) NSString *subject; // 主题
@property (nonatomic, copy) NSString *date;    // 日期
@property (nonatomic, copy) NSString *snippet; // 摘要
@property (nonatomic, assign) HPMailDirectDrawCellStatus mailStatus; // 邮件状态
@property (nonatomic, assign) BOOL hasAttachment;  // 是否有附件
@property (nonatomic, assign) BOOL isMailSelected; // 是否已发送

@end

//  HPMailDirectDrawCell.m
#import "HPMailDirectDrawCell.h"

@implementation HPMailDirectDrawCell

#pragma mark - Lifecycle
// 省略初始化方法...

// 覆盖 drawRect 方法
- (void)drawRect:(CGRect)rect {

    // 1.邮箱状态
    UIImage *statusImage = nil;
    switch (self.mailStatus) {
        case HPMailDirectDrawCellStatusUnread:
            statusImage = [UIImage imageNamed:@"mail_unread"];
            break;
        case HPMailDirectDrawCellStatusRead:
            statusImage = [UIImage imageNamed:@"mail_read"];
            break;
        case HPMailDirectDrawCellStatusReplied:
            statusImage = [UIImage imageNamed:@"mail_replied"];
            break;
    }
    CGRect statusRect = CGRectMake(8, 4, 12, 12);
    [statusImage drawInRect:statusRect];

    // 2.附件
    UIImage *attachmentImage = nil;
    if (self.hasAttachment) {
        attachmentImage = [UIImage imageNamed:@"mail_attachment"];
    }
    CGRect attachmentRect = CGRectMake(8, 20, 12, 12);
    [attachmentImage drawInRect:attachmentRect];

    // 3.邮件选中状态
    UIImage *selectedImage = [UIImage imageNamed:
        (self.isMailSelected ? @"mail_selected" : @"mail_unselected")];
    CGRect selectedRect = CGRectMake(8, 36, 12, 12);
    [selectedImage drawInRect:selectedRect];

    // 或者使用 Core Graphics绘制矢量图像

    CGFloat fontSize = 13;
    CGFloat width = rect.size.width;
    CGFloat remainderWidth = width - 28;

    // 4.邮箱
    CGFloat emailWidth = remainderWidth - 72;
    UIFont *emailFont = [UIFont boldSystemFontOfSize:fontSize];
    NSDictionary *attrs = @{NSFontAttributeName : emailFont};
    [self.email drawInRect:CGRectMake(28, 4, emailWidth, 16) withAttributes:attrs];

    // 5.主题、6.摘要
    UIFont *stdFont = [UIFont systemFontOfSize:fontSize];
    NSDictionary *attrs2 = @{NSFontAttributeName : stdFont};
    [self.subject drawInRect:CGRectMake(28, 24, remainderWidth, 16) withAttributes:attrs2];
    [self.snippet drawInRect:CGRectMake(28, 44, remainderWidth, 16) withAttributes:attrs2];

    // 7.日期
    UIFont *verdana = [UIFont fontWithName:@"Verdana" size:10];
    NSDictionary *attrs3 = @{NSFontAttributeName : verdana};
    [self.date drawInRect:CGRectMake(width - 60, 4, 60, 16) withAttributes:attrs3];
}
绘制图像的其它方法
// YYKit 中的方法,封装了可以绘制圆角的功能,最终还是调用了 drawInRect: 方法绘制图片。
- (void)drawInRect:(CGRect)rect withContentMode:(UIViewContentMode)contentMode clipsToBounds:(BOOL)clips{
    CGRect drawRect = YYCGRectFitWithContentMode(rect, self.size, contentMode);
    if (drawRect.size.width == 0 || drawRect.size.height == 0) return;
    if (clips) {
        CGContextRef context = UIGraphicsGetCurrentContext();
        if (context) {
            CGContextSaveGState(context);
            CGContextAddRect(context, rect);
            CGContextClip(context);
            [self drawInRect:drawRect];
            CGContextRestoreGState(context);
        }
    } else {
        [self drawInRect:drawRect];
    }
}
使用 Core Graphics 绘制矢量图像:
// 获取上下文
CGContextRef context =UIGraphicsGetCurrentContext();
// 绘制的图片
UIImage *image = [UIImage imageNamed:@"image.png"];
// 使用Quarzt2D绘制的图片是倒置的,使用下方法设置坐标原点和显示比例来改变坐标系
CGContextTranslateCTM(context,0.0f,self.frame.size.height);
CGContextScaleCTM(context,1.0,-1.0);
// 在上下文绘制图片
CGContextDrawImage(context,CGRectMake(220,130, image.size.width, image.size.height), image.CGImage);
四、真机测试
💡 应用以 60 FPS 流畅运行的最低要求是,在 16.66 毫秒内完成向下一帧过度的全部操作。
注:以下数据通过运行 iOS 11.1.2 (15B202) 系统的 iPhone 7 测试获得。
测试耗时方法参考:https://gist.github.com/bignerdranch/2006587
复合视图(NIB 方式)
使用 NIB 方式创建 UITableViewCell。

控制台输出:
2017-12-06 14:36:09.874935+0800 HighPerformanceUI[16261:3579882] [cell 0]:Time=10111458 ns
2017-12-06 14:36:09.890794+0800 HighPerformanceUI[16261:3579882] [cell 1]:Time=8530750 ns
2017-12-06 14:36:09.903253+0800 HighPerformanceUI[16261:3579882] [cell 2]:Time=6119000 ns
2017-12-06 14:36:09.914309+0800 HighPerformanceUI[16261:3579882] [cell 3]:Time=6263000 ns
2017-12-06 14:36:09.924998+0800 HighPerformanceUI[16261:3579882] [cell 4]:Time=5909041 ns
2017-12-06 14:36:09.935583+0800 HighPerformanceUI[16261:3579882] [cell 5]:Time=5874208 ns
2017-12-06 14:36:09.946026+0800 HighPerformanceUI[16261:3579882] [cell 6]:Time=5770791 ns
2017-12-06 14:36:09.954495+0800 HighPerformanceUI[16261:3579882] [cell 7]:Time=4502458 ns
2017-12-06 14:36:09.962873+0800 HighPerformanceUI[16261:3579882] [cell 8]:Time=4586708 ns
2017-12-06 14:36:09.971758+0800 HighPerformanceUI[16261:3579882] [cell 9]:Time=4689791 ns
2017-12-06 14:36:09.981224+0800 HighPerformanceUI[16261:3579882] [cell 10]:Time=4822166 ns
2017-12-06 14:36:09.989914+0800 HighPerformanceUI[16261:3579882] [cell 11]:Time=5009750 ns
2017-12-06 14:36:09.997674+0800 HighPerformanceUI[16261:3579882] [cell 12]:Time=4151583 ns
2017-12-06 14:36:10.004306+0800 HighPerformanceUI[16261:3579882] [cell 13]:Time=3466333 ns
2017-12-06 14:36:10.521526+0800 HighPerformanceUI[16261:3579882] -[HPMailCompositeTableViewController viewDidAppear:]
2017-12-06 14:36:11.392751+0800 HighPerformanceUI[16261:3579882] [cell 10]:Time=808458 ns
2017-12-06 14:36:11.541379+0800 HighPerformanceUI[16261:3579882] [cell 11]:Time=517666 ns
2017-12-06 14:36:11.707820+0800 HighPerformanceUI[16261:3579882] [cell 12]:Time=514291 ns
2017-12-06 14:36:12.246696+0800 HighPerformanceUI[16261:3579882] [cell 13]:Time=1041750 ns
2017-12-06 14:36:12.293053+0800 HighPerformanceUI[16261:3579882] [cell 14]:Time=1011333 ns
2017-12-06 14:36:12.391600+0800 HighPerformanceUI[16261:3579882] [cell 15]:Time=627208 ns
2017-12-06 14:36:12.557976+0800 HighPerformanceUI[16261:3579882] [cell 16]:Time=656208 ns
2017-12-06 14:36:13.093015+0800 HighPerformanceUI[16261:3579882] [cell 17]:Time=1229708 ns
2017-12-06 14:36:13.142731+0800 HighPerformanceUI[16261:3579882] [cell 18]:Time=1018208 ns
2017-12-06 14:36:13.209316+0800 HighPerformanceUI[16261:3579882] [cell 19]:Time=1027208 ns
2017-12-06 14:36:13.693038+0800 HighPerformanceUI[16261:3579882] [cell 20]:Time=819666 ns
2017-12-06 14:36:13.726195+0800 HighPerformanceUI[16261:3579882] [cell 21]:Time=1128666 ns
测试数据:
| 任务 | 多次统计值(毫秒) | 耗时评估 |
|---|---|---|
| 首次初始化 | 10.1、11.72、10.23、9.9 | ⚠️高 |
| 后续初始化 | 3.1~7.6、3.3~8.5、3.3~8.5、3.1~8.4 | 中 |
| 滚动后的首次初始化 | 0.75、0.74、0.58、0.42 | 低 |
| 滚动后的第二次初始化 | 0.49、0.5、0.49、0.49 | 低 |
| 重用 | 0.48~0.64、0.52~0.99、0.41~1.1、0.62~2.3 | 低 |
| 内存 | 2M 左右 | 中 |
结论
- 首次初始化和后续初始化相对耗时。
- 滚动后的初始化及重用耗时较低。
- 因为是使用的 NIB 方式创建视图,而加载 XML 格式的 NIB 资源会消耗些许资源,因此会有一定的内存占用。
复合视图(手写代码)
使用手写代码的方式创建 UITableViewCell。
测试数据:
| 任务 | 多次统计值(毫秒) | 耗时评估 |
|---|---|---|
| 首次初始化 | 5.5、7.8、7.5 | 高 |
| 后续初始化 | 3.3~5.1、3.4~7.4、3.4~7.4 | 中 |
| 滚动后的首次初始化 | 0.87、0.98、1.2 | 低 |
| 滚动后的第二次初始化 | 0.73、0.96、0.95 | 低 |
| 重用 | 0.8~2.7、0.98~1.4、0.9~1.4 | 低 |
| 内存 | 0.6M 左右 | 低 |
结论
- 首次初始化和后续初始化耗时相对于 NIB 方式低 50%。
- 滚动后的初始化及重用耗时,相对于 NIB 方式 高 50%。
- 此方式内存占用最少。
直接绘制
通过覆盖 drawRect: 方法直接绘制内容的方式创建 UITableViewCell。
测试数据
| 任务 | 多次统计值(毫秒) | 耗时评估 |
|---|---|---|
| 首次初始化 | 1.6、1.5、1.0、1.2、1.8 | 低 |
| 后续初始化 | 0.9~1.2、0.87~0.93、0.87~1.0 | 低 |
| 滚动后的首次初始化 | 0.39、0.38、0.37 | 低 |
| 滚动后的第二次初始化 | 0.42、0.42、0.43 | 低 |
| 重用 | 0.42~0.69、0.27~0.95、0.43~1.2 | 低 |
| 内存 | 10M 左右 | ⚠️非常高 |
结论
- 无论是首次初始化还是后续滚动重用,耗时都是最少的,基本在 1 毫秒左右。
- 内存占用恐怖,将近 10M。之前也看到一篇文章讲
dwawRect:方法会占据大量内存的,感兴趣的可以去看看:内存恶鬼 drawRect。
总结:复合视图 VS 直接绘图
性能:
原文结论:从性能角度来看,在某些时候,直接绘图提供的性能比复合视图提供的要好一个数量级。
我的结论:
- 从耗时上看,直接绘图提供的性能确实比复合视图提供的要好很多:直接绘图耗时更低,且耗时稳定在 1 毫秒左右,它的耗时波动性更小。而复合视图耗时不稳定,峰谷值差异较大,容易产生卡顿。
- 但是,从内存占用上看,复合视图占用内存比直接绘图占用内存更少:手写代码 < NIB 文件 < 直接绘图。
维护:
原文结论:从代码可维护角度来看,直接绘图的代码会难以维护和发展。一旦应用稳定下来,你就可以比较明确地将复合 UI 换成直接绘图。
我的结论:因为原文中,没有对内存占用这一项性能指标作评估,而直接绘图的内存占用不容轻易忽视。因此,是否真的要在实际项目中将复合视图替换成直接绘图还有待商榷,而优化是以代码复杂度和开发人员生产力为代价的。
Premature optimization is the root of all evil — DonaldKnuth
源码
GitHub:Andy0570/HighPerformanceUI
参考
- Simple Strategies for Smooth Animation on the iPhone @Twitter Blog
- When should I set layer.shouldRasterize to YES @stackoverflow
- iOS 保持界面流畅的技巧 @一只魔法师的工坊
- Optimising Autolayout