
如何在 iOS 应用上用自定义视图实现星级评分功能呢?最近研究学习了两个实现方法,现总结如下:
一、实现方式一
参考 Ray Wenderlich 系列教程:
UIView Tutorial for iOS: How To Make a Custom UIView in iOS 5: A 5 Star Rating View
1.Demo 示例
2. 实现的功能:
- 可任意设置星星数量;
- 可以设置星星是否可编辑、星星的左边距、星星之间的间隔等;
- 整星评价和半星评价;
- 不仅仅是点击触摸屏幕评分,还可以实现手指按住屏幕滑动评分;
- 用 Delegate 方式实现回调;
3. 视图层级
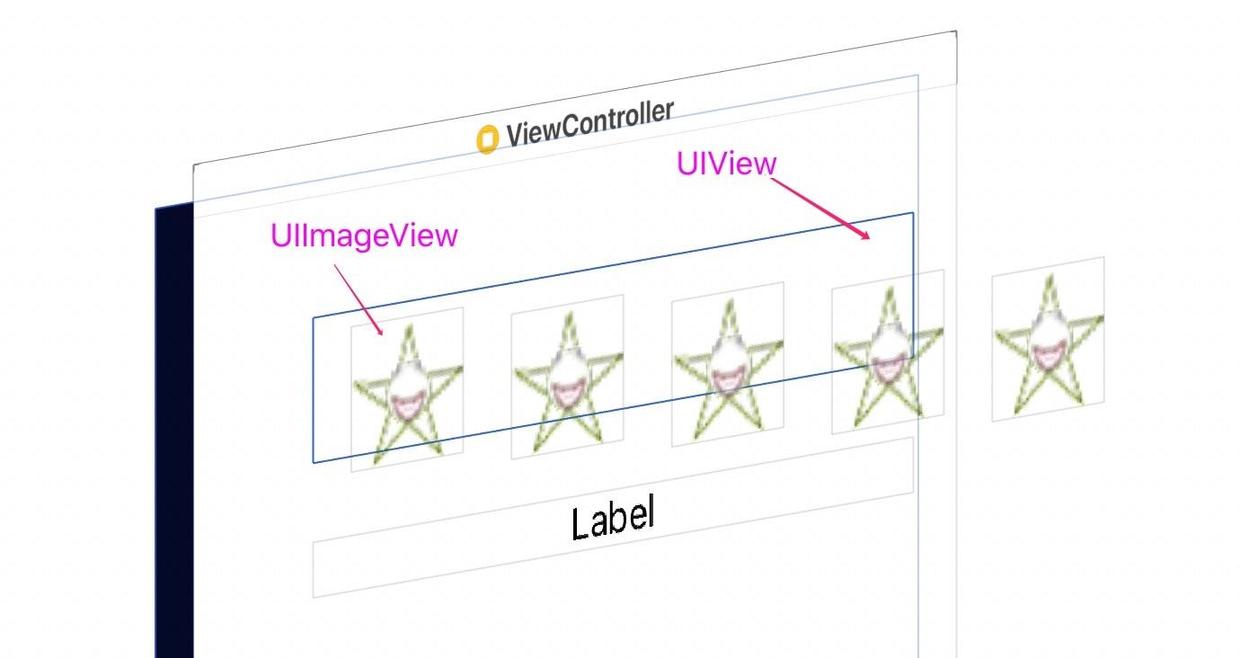
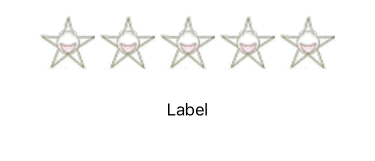
视图的层级比较简单,一个自定义 UIView 子类对象,上面添加了 5 个星星图片对象,即 UIImageView 对象。
评分值修改时,我们需要遍历这 5 个 UIImageView 对象,并对他们的图片进行相应的更改。
4. 实现原理:根据 rating 值遍历设置每个星星图案
讲解一下大概的实现思路,具体内容可以参考源码:GitHub
- 首先需要三张星星图片:空星图片、半星图片、全星图片:


初始化设置最大评分数
maxRating(即总共的星星数量)时,就把所有的 imageView 添加到视图上,然后发送[self setNeedsLayout]方法让系统布局子视图(即layoutSubviews),计算每个 imageView 的位置和大小:<!–hexoPostRenderEscape:
/*
设置最大评分数,它决定了我们会有多少个 UIImageView 子视图
做了两件事:
1.添加图片:根据最大评分数初始化图片数量,移除旧图片,添加新图片。
2.刷新UI,设置图片大小:调用 setNeedsLayout 方法后,系统会调用 layoutSubviews 方法来设置每个图片的位置和大小。
*/
(void)setMaxRating:(int)maxRating {
_maxRating = maxRating;
// 移除所有旧的图片
for (int i = 0; i < self.imageViews.count; i++) {
UIImageView *imageView = (UIImageView *)[self.imageViews objectAtIndex:i];
[imageView removeFromSuperview];
}
[self.imageViews removeAllObjects];
// 重新添加新的图片
for (int i = 0; i < maxRating; i++) {
UIImageView *imageView = [[UIImageView alloc] init];
imageView.contentMode = UIViewContentModeScaleAspectFit;
[self.imageViews addObject:imageView];
[self addSubview:imageView];
}
// 重新布局、刷新UI
[self setNeedsLayout];
[self refresh];
}
// 设置合适的子视图大小
(void)layoutSubviews {
[super layoutSubviews];if (!self.notSelectedImage) {
return;}
/*
设置每个五角星的尺寸大小
这里,教程中的计算方法如下,请仔细看,他的数学估计是体育老师教的吧。😂😂😂
float desiredImageWidth = (self.frame.size.width - (self.leftMargin2) - (self.midMarginself.imageViews.count)) / self.imageViews.count;
/
float desiredImageWidth = (self.frame.size.width - self.leftMargin2 -(self.midMargin*(self.imageViews.count-1))) / self.imageViews.count;
float imageWidth = MAX(self.minImageSize.width, desiredImageWidth);
float imageHeight = MAX(self.minImageSize.height, desiredImageWidth);
for (int i = 0; i < self.imageViews.count; i++) {UIImageView *imageView = [self.imageViews objectAtIndex:i]; CGRect imageFrame = CGRectMake(self.leftMargin + i*(self.midMargin+imageWidth), 0, imageWidth, imageHeight); imageView.frame = imageFrame;}:hexoPostRenderEscape–>
}
以上两个步骤中,我们设置了最大评分数、添加并布局好了所有的 imageView。接下来,需要接收用户事件,根据用户手指触摸的位置计算评分值
rating:首先,要接受用户的触摸事件:
因为 UIView 是 UIResponder 的子类,所以覆盖以下四个方法就可以处理四种不同的触摸事件:
<!–hexoPostRenderEscape:
// ① 一根手指或多根手指触摸屏幕
- (void)touchesBegan:(NSSet<UITouch *> *)touches withEvent:(nullable UIEvent *)event;
// ② 一根手指或多根手指在屏幕上移动(随着手指的移动,相关的对象会持续发送该消息)
- (void)touchesMoved:(NSSet<UITouch *> *)touches withEvent:(nullable UIEvent *)event;
// ③ 一根手指或多根手指离开屏幕
- (void)touchesEnded:(NSSet<UITouch *> *)touches withEvent:(nullable UIEvent *)event;
// ④ 在触摸操作正常结束前,某个系统事件(例如突然来电话)打断了触摸过程
(void)touchesCancelled:(NSSet<UITouch *> *)touches withEvent:(nullable UIEvent *)event;:hexoPostRenderEscape–>这里我们只用到了前三个方法:
<!–hexoPostRenderEscape:
- (void)touchesBegan:(NSSet<UITouch *> *)touches withEvent:(UIEvent *)event {
  UITouch *touch = [touches anyObject];
  CGPoint touchLocation = [touch locationInView:self];
  [self handleTouchAtLocation:touchLocation];
}
(void)touchesMoved:(NSSet<UITouch *> *)touches withEvent:(UIEvent *)event {
UITouch *touch = [touches anyObject];
CGPoint touchLocation = [touch locationInView:self];
[self handleTouchAtLocation:touchLocation];
}(void)touchesEnded:(NSSet<UITouch *> *)touches withEvent:(UIEvent *)event {:hexoPostRenderEscape–>
[self.delegate rateView:self ratingDidChange:self.rating];
}最最重要的是,计算评分值的方法:将当前手指触摸位置的 X 值与每个
imageView宽度的中点作比较:![五角星-2]()
如果触摸位置的 X 值 > 当前图片宽度的中点,那
rating值就是整数,是全星评价。如果 触摸位置的 X 值 <= 当前图片宽带的中点,并且触摸位置的 X 值> 当前图片的起始值,那
rating值就是 非整数,半星评价。<!–hexoPostRenderEscape:
// 根据手指触摸位置,计算当前评分值
(void)handleTouchAtLocation:(CGPoint)touchLocation {
if (!self.editable) {return;}
float newRating = 0;
for (NSInteger i = self.imageViews.count - 1; i >= 0 ; i–) {UIImageView *imageView = [self.imageViews objectAtIndex:i]; CGFloat originValue = imageView.frame.origin.x; CGFloat midValue = originValue + imageView.frame.size.width / 2; if (touchLocation.x > midValue) { newRating = i+1; break; }else if ((touchLocation.x > originValue) && (touchLocation.x <= midValue)) { newRating = i + 0.5; break; }else { continue; }}
self.rating = newRating;
}(void)setRating:(float)rating {:hexoPostRenderEscape–>
_rating = rating;
[self refresh]; // 每次评分值改变,就调用刷新方法,重新设置 imageView.![Demo]()
}


上面一个步骤,我们得到了评分值。最后,每次
rating值该改变,就重新设置 imageView:<!–hexoPostRenderEscape:
// 刷新视图,根据当前评分修改对应的五角星图片
(void)refresh {:hexoPostRenderEscape–>
// 从左往右遍历每个小星星
for (int i = 0; i < self.imageViews.count; i++) {
}UIImageView *imageView = [self.imageViews objectAtIndex:i]; if (self.rating >= i+1) { // 如果 rating >= 该星星图片的索引,则该星星是全星图片。 imageView.image = self.fullSelectedImage; }else if (self.rating > i) { // 如果 rating > 上一个图片索引,则该星星是半星图片。 imageView.image = self.halfSelectedImage; }else { // 默认,空星图片。 imageView.image = self.notSelectedImage; }
}
- 整个实现思路大致如上。
实现方式二
参考 @XHJCoder 的源码:
简书:【iOS】实现星级评分
1.Demo 示例
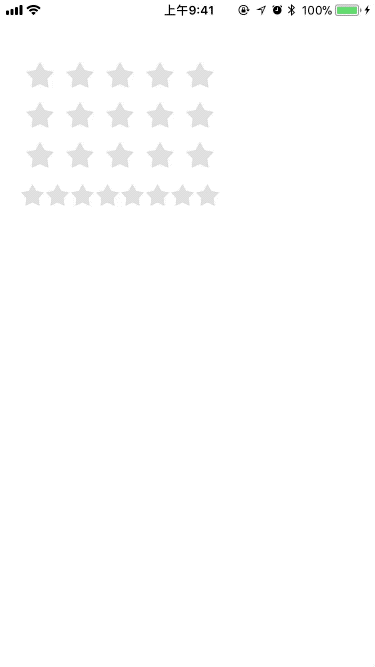
2. 实现的功能
- 可任意设置星星数量;
- 支持动画修改评论;
- 评分样式支持:整星评论、半星评论、不完整星星评论;
- 支持 block 和 delegate 两种方式返回修改结果;
3. 实现原理,根据 rating 值整体修改视图的 frame 宽度
我对源码 fork 并进行了一些修改:XHStarRateView
下面是视图的层级结构:

- backgroundStarView 、foregroundStarView 是 UIView 的实例对象。
- backgroundStarView 视图上添加 5 个灰色的 imageView。
- foregroundStarView 视图上添加 5 个黄色的 image View。
初始化时添加所有视图:
<!–hexoPostRenderEscape:
// 指定初始化方法
(instancetype)initWithFrame:(CGRect)frame
numberOfStar:(NSInteger)numberOfStar rateStyle:(XHStarRateViewRateStye)rateStyle isAnimation:(BOOL)isAnimation completion:(XHStarRateViewRateCompletionBlock)completionBlock delegate:(id)delegate{
if (self = [super initWithFrame:frame]) {_numberOfStar = numberOfStar; _rateStyle = rateStyle; _isAnimation = isAnimation; _completionBlock = completionBlock; _delegate = delegate; [self createStarView];}
return self;
}(void)createStarView {
self.foregroundStarView = [self createStarViewWithImageNamed:KForegroundStarImage];
self.backgroundStarView = [self createStarViewWithImageNamed:KBackgroundStarImage];self.foregroundStarView.frame = CGRectMake(0, 0, self.bounds.size.width * _currentRating / _numberOfStar, self.bounds.size.height);
[self addSubview:self.backgroundStarView];
[self addSubview:self.foregroundStarView];//…
}(UIView *)createStarViewWithImageNamed:(NSString *)name {
UIView *view = [[UIView alloc] initWithFrame:self.bounds];
view.clipsToBounds = YES;
view.backgroundColor = [UIColor clearColor];
for (NSInteger i = 0; i < _numberOfStar; i ++) {UIImageView *imageView = [[UIImageView alloc] initWithImage:[UIImage imageNamed:name]]; imageView.frame = CGRectMake(i * self.bounds.size.width / _numberOfStar, 0, self.bounds.size.width / _numberOfStar, self.bounds.size.height); imageView.contentMode = UIViewContentModeScaleAspectFit; [view addSubview:imageView];}:hexoPostRenderEscape–>
return view;
}
使用 UITapGestureRecognizer 实现手势识别并更新 rating 值:
<!–hexoPostRenderEscape:
- (void)createStarView {
//...UITapGestureRecognizer *tapGesture = [[UITapGestureRecognizer alloc] initWithTarget:self action:@selector(userTapRateView:)];
tapGesture.numberOfTapsRequired = 1;
[self addGestureRecognizer:tapGesture];
}
// 这里面用到了两个数学函数
// ceilf():返回大于或者等于指定表达式的最小整数。
// roundf():返回四舍五入的整数。
(void)userTapRateView:(UITapGestureRecognizer *)gesture {
CGPoint tapPoint = [gesture locationInView:self];
CGFloat offset = tapPoint.x;
CGFloat realRating = offset / (self.bounds.size.width / _numberOfStar);switch (_rateStyle) {
case XHStarRateViewRateStyeFullStar: { self.currentRating = ceilf(realRating); break; } case XHStarRateViewRateStyeHalfStar: { float round = roundf(realRating); self.currentRating = (round > realRating) ? round : (round + 0.5); break; } case XHStarRateViewRateStyeIncompleteStar: { self.currentRating = realRating; break; }}:hexoPostRenderEscape–>
}
每次更新 rating 值就修改 foregroundStarView 的 frame 宽度实现动画效果。
- (void)layoutSubviews {
 [super layoutSubviews];

 CGFloat animationDuration = (self.isAnimation ? 0.2 : 0);
 [UIView animateWithDuration:animationDuration animations:^{
     self.foregroundStarView.frame = CGRectMake(0, 0, self.bounds.size.width / self.numberOfStar * self.currentRating, self.bounds.size.height);
 }];
}
OK,第二种方法就是实现如上。
第二种方法封装得相对第一种方法更好一些,调用也很方便:
<!–hexoPostRenderEscape:
/*- Delegate 方式创建
*/
XHStarRateView *starRateView = [[XHStarRateView alloc] initWithFrame:CGRectMake(20, 60, 200, 30)];
starRateView.isAnimation = YES; // 有动画
starRateView.rateStyle = XHStarRateViewRateStyeIncompleteStar; //允许不完整星评论
starRateView.tag = 1;
starRateView.delegate = self;
[self.view addSubview:starRateView];
/*
 2. 初始化方法创建
 半星评论、无动画
 */
XHStarRateView *starRateView2 = [[XHStarRateView alloc] initWithFrame:CGRectMake(20, 100, 200, 30)
                                                         numberOfStar:5
                                                            rateStyle:XHStarRateViewRateStyeHalfStar
                                                          isAnimation:NO
                                                             delegate:self];
starRateView2.tag = 2;
[self.view addSubview:starRateView2];
/*
 3. block 方法1
 默认设置:完整星评论、
 */
XHStarRateView *starRateView3 = [[XHStarRateView alloc] initWithFrame:CGRectMake(20, 140, 200, 30) completion:^(CGFloat currentScore) {
    NSLog(@"3—-  %f",currentScore);
}];
[self.view addSubview:starRateView3];
/*:hexoPostRenderEscape–>
4. block 方法2
半星评论、有动画
*/
XHStarRateView *starRateView4 = [[XHStarRateView alloc] initWithFrame:CGRectMake(20, 180, 200, 30) numberOfStar:8 rateStyle:XHStarRateViewRateStyeHalfStar isAnimation:YES completion:^(CGFloat currentScore) {
NSLog(@"4—- %f",currentScore);
}];
[self.view addSubview:starRateView4];
第三方框架
- AXRatingView