Node 基础
JavaScript 是编程语言,而 Node.js 是执行环境。
Node.js 是一个基于 Chrome V8 引擎的 JavaScript 运行环境(runtime)。
Node.js 特性:事件驱动、异步 API、非阻塞 I/O。
Node.js 是专为数据密集型实时程序(DITR)设计的。
Node.js 通过事件轮询(event loop)来实现非阻塞 I/O 网络的调用,而事件轮询是单向运行的先入先出队列。
ES2015
ECMAScript 2015 是 ECMAScript 标准的第 6 个版本,所以有时候也被称为 ES6,一般简写为 ES2015。
Node 支持的 ES2015 特性汇总
类
ES5 之前需要用 prototype 对象来创建类似于类的结构:
function User() {
  // 构造器
}

User.prototype.method = function () {
  // 方法
}
ES6 版本支持类:
class User {
  constructor() {}
  method() {}
}
const 和 let 解决作用域问题
在 ES5 中,所有的变量都是用 var 创建的。
应该用
const还是let?在决定是用
const还是用let时,几乎都可以用const。因为你的大部分代码都是在用你自己的类实例、对象常量或不会变的值,所以大部分情况下都可以用const。即便是有可修改属性的对象,也是可以用const声明的,因为const的意思是引用是只读的,而不是值是不可变的。
原生的 promise 和生成器支持
生成器能把异步 I/O 变成同步编程风格。
模版字符串
用反引号(`)定义模版字符串
// ES5 中,字符串常量不支持插值,也不支持跨行。
// 旧的方法
var a = 1;
console.log('一共有 ' + a + ' 个鸡蛋!');

// 模版字符串语法
var a = 1;
console.log(`一共有 ${a} 个鸡蛋!`);
箭头函数
旧版语法:
const http = require('http');
const port = 8080;

const server = http.createServer(function (req, res) {
  res.end('Hello, world.');
});

server.listen(port, function () {
  console.log('Server listening on: http://localhost:%s', port);
});
箭头函数语法:
const http = require('http');
const port = 8080;

const server = http.createServer((req, res) => {
  res.end('Hello, world.');
});

server.listen(port, () => {
  console.log('Server listening on: http://localhost:%s', port);
});
Node.js 架构
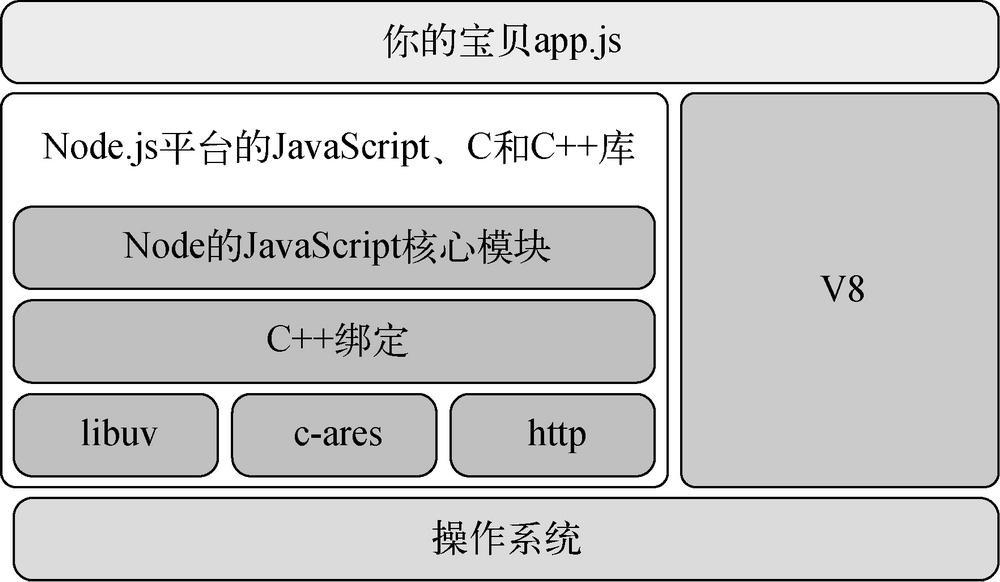
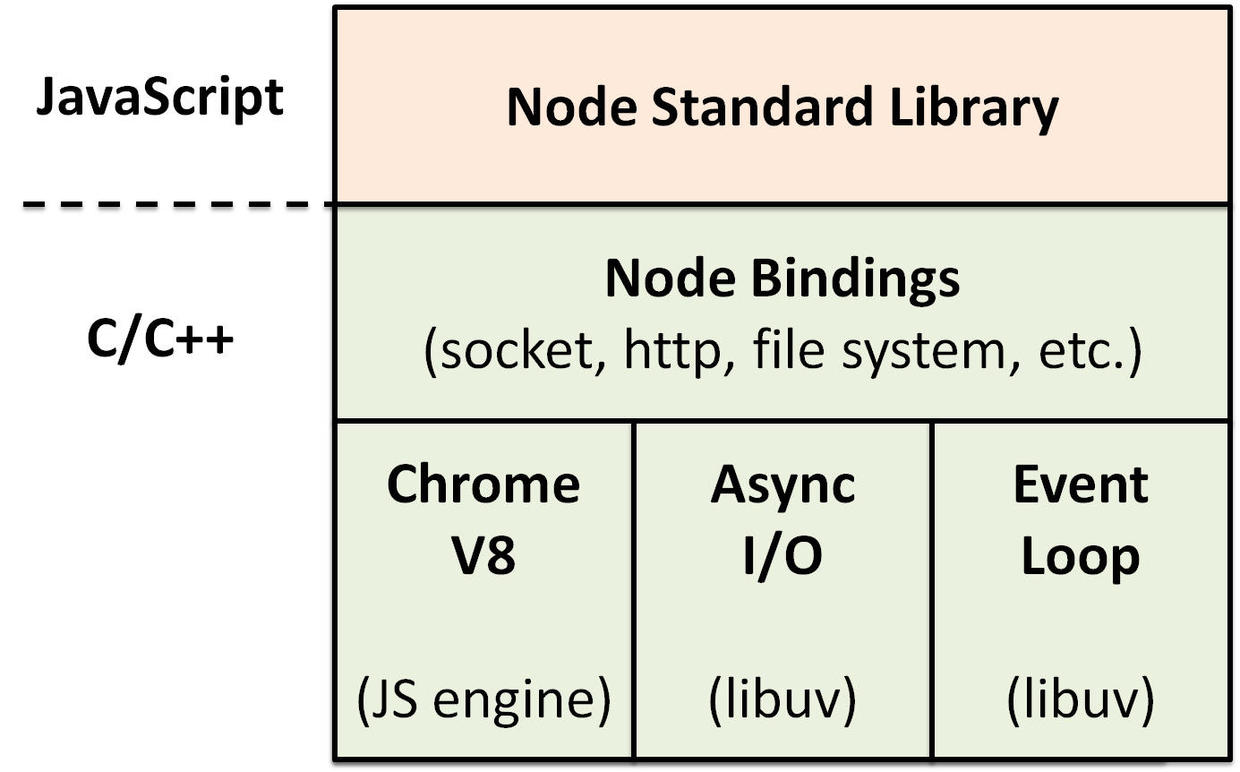
说明:
- libuv 是提供快速、跨平台、非阻塞 I/O 的本地库;
- V8 负责 JavaScript 代码的解释和执行,它可以将 JavaScript 直接编译为机器码;
- C++ 绑定层可以将 libuv 和 V8 结合起来。
Node 的使用场景
Node 程序主要可以分成三种类型:Web 应用程序、命令行工具、和后台程序、桌面程序。
Node 功能的组织及重用
Node 模块打包代码是为了重用,但它们不会改变全局作用域。
Node 的模块系统避免了对全局作用域的污染,从而也就避免了命名冲突,并简化了代码的重用。
模块即可以是一个文件,也可以是包含一个或多个文件的目录(默认模块入口为 index.js 文件)。
currency.js
自定义模块,在该文件中添加两个货币转换函数:
方法:通过设定 exports 对象的属性来指明要暴露的函数或变量。
// 私有变量,外界无法访问到。
var candaianDollar = 0.91;

function roundTwoDecimals(amount) {
    return Math.round(amount * 100) / 100;
}

// canadianToUS() 函数设定在 exports 模块中,所以引入这个模块的代码可以使用它。
exports.canadianToUS = function (canadian) {
    return roundTwoDecimals(canadian * candaianDollar);
}

// USToCanadian() 函数也设定在 exports 模块中。
exports.USToCanadian = function (us) {
    return roundTwoDecimals(us / candaianDollar);
}
test-currency.js
引入模块
// require() 函数是一个同步I/O函数,一般在文件顶端引入。
// 相对路径 ./ 表示当前同一目录下。
const currency = require('./currency');

// 使用 currency 模块的 canadianToUS() 函数
console.log(currency.canadianToUS(50));

// 使用 currency 模块的 USToCanadian() 函数
console.log(currency.USToCanadian(30));
用 module.exports 微调模块的创建
如果只需要从模块中得到一个函数,那么从 require 中返回一个函数的代码比返回一个对象的代码更优雅。
不能用任何其他对象、函数或者变量给 exports 赋值。
我的理解:可以把函数或者对象设置为 exports 的属性(
exports.function = {...}),但是不能把函数或者对象赋值(exports = function)给 exports。用 module.exports 可以对外提供单个变量、函数或者对象。
如果你创建了一个既有 exports 又有 module.exports 的模块,那它会返回 module.exports,而 exports 会被忽略。
exports 与 module.exports
最终在程序里导出的是 module.exports。exports 只是对 module.exports 的一个全局引用,最初被定义为一个可以添加属性的空对象。所以 exports.myFunc 只是 module.exports.myFunc 的简写。
所以,如果把 exports 设定为别的,就打破了 module.exports 和 exports 之间的引用关系。
- 根据需要使用 exports 或 module.exports 可以将功能组织成模块,规避掉程序脚本一直增长产生的弊端。
用 node_modules 重用模块
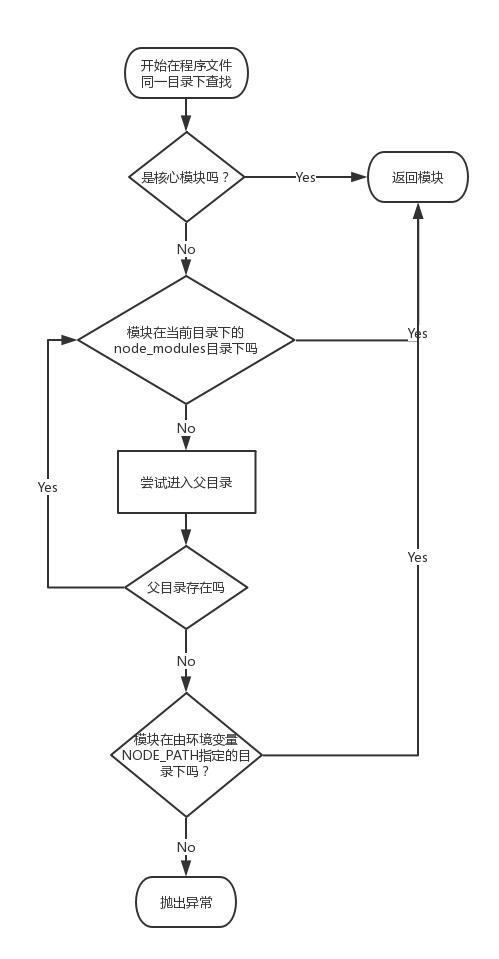
- 用环境变量 NODE_PATH 可以改变 Node 模块的默认路径。
注意事项
- 如果模块是目录,在模块目录中定义模块的文件必须被命名为 index.js,除非你在这个目录下一个叫 package.json 的文件里特别指明。
- Node 能把模块作为对象缓存起来。Node 加载模块的顺序:缓存模块 > 核心模块 > 当前目录模块 > node_modules 模块。
- 有些常用的 Node 核心模块在 Node 初始化时就被加载缓存起来了,所以加载速度相对也会更快。
异步编程技术
Node 中两种响应逻辑管理方式:回调和事件监听。
回调:适用于一次性异步逻辑。
事件发射器:把异步逻辑跟一个概念实体关联起来,可以通过监听器轻松管理。
流程控制:可以管理异步任务的执行顺序,串行执行或者并行执行。
1. 用回调处理一次性事件
回调是一个函数,它被当做参数传给异步函数,它描述了异步操作完成之后要做什么。

title.json
JSON 文件会被格式化成一个包含文章标题的字符串数组。
[
    "Kazakhstan is a huge country...what goes on there?",
    "This weather is making me craaazy",
    "My neighbor sort of howls at night"
]
template.html
HTML 模版文件,% 会被替换为博客文章的标题。
<!DOCTYPE html>
<html>
<head>
    <meta charset="utf-8" />
    <meta http-equiv="X-UA-Compatible" content="IE=edge">
    <title>Page Title</title>
    <meta name="viewport" content="width=device-width, initial-scale=1">
</head>
<body>
    <h1>Latest Posts</h1>
    <ul><li>%</li></ul>
</html>
blog_recent.js
功能如下:
- 异步获取存放在 JSON 文件中的文章的标题;
- 异步获取简单的 HTML 模版;
- 把标题组装在 HTML 模版中;
- 把 HTML 页面发送给用户。
// 获取 JSON 文件中的标题,并渲染 Web 页面
'use strict';

const http = require('http');
const fs = require('fs');
const path = require('path');

// 创建 HTTP 服务器,并用回调定义响应逻辑
http.createServer(function (req, res) {
    if (req.url == '/') {
        // 读取 JSON 文件并用回调定义如何处理其中的内容
        // fs.readFile() 直接读取文件的相对路径会报错,这里用 path 拼接。
        fs.readFile(path.join(__dirname, './titles.json'), function (err, data) {
            // 如果出错,输入错误日志,并给客户端返回错误
            if (err) {
                console.error(err);
                res.end('Server Error: Read JSON File Error');
            }else {
                // 从 JSON 文本中解析数据
                var titles = JSON.parse(data.toString());

                // 读取 HTML 模版,并在加载完成后使用回调
                fs.readFile(path.join(__dirname, './template.html'), function (err, data) {
                    if (err) {
                        console.error(err);
                        res.end('Server Error: Read html Error');
                    }else {
                        var tmp1 = data.toString();

                        // 组装 HTML 页面以显示博客标题
                        var html = tmp1.replace('%', titles.join('</li><li>'));
                        res.writeHead(200, {'Content-Type': 'text/html'});
                        // 将 HTML 页面发送给用户
                        res.end(html);
                    }
                });
            }
        });
    }
}).listen(8000, '127.0.0.1');
这个示例嵌入了三层回调:
http.createServer(function (req, res) {
    fs.readFile(path.join(__dirname, './titles.json'), function (err, data) {
        fs.readFile(path.join(__dirname, './template.html'), function (err, data) {
        });
    });
});
优化方式:创建中间函数以减少嵌套(也可以理解为:将代码模块化)。
就是把步骤中的单一功能抽象为单独的中间函数。
…
优化方式:通过尽早返回减少嵌套。
const http = require('http');
const fs = require('fs');
const path = require('path');

const server = http.createServer(function (req, res) {
    getTitles(res);
}).listen(8000, "127.0.0.1");

function getTitles(res) {
    fs.readFile(path.join(__dirname, './titles.json'), function (err, data) {
        // 不再创建 else 分支,而是直接return,因为如果出错的话,也没有必要继续执行这个函数了。
        if (err) return hadError(err, res);
        getTemplate(JSON.parse(data.toString()), res);
    });
}

function getTemplate(titles, res) {
    fs.readFile(path.join(__dirname, './template.html'), function (err, data) {
        if (err) return hadError(err, res);
        formatHtml(titles, data.toString(), res);
    });
}

function formatHtml(titles, tmp1, res) {
    var html = tmp1.replace('%', titles.join('</li><li>'));
    res.writeHead(200, {'Content-Type': 'text/html'});
    res.end(html);
}

function hadError(err, res) {
    console.error(err);
    res.end('Server Error');
}
Node 的异步回调惯例
Node 中的大多数内置模块在使用回调时都会带两个参数:第一个用来放可能会发生的错误,第二个放结果。错误参数经常被缩写为 err。
下面是这个常用的函数签名的典型示例:
var fs = require('fs');
fs.readFile('./titles.json', function (err, data) {
    if (err) throw err;
    // do something with data if no error has occurred
})
2. 用事件发射器处理重复性事件
事件发射器会触发事件,并且在那些事件被触发时能处理它们。
事件是通过监听器进行处理的。
监听器是跟事件相关联的、当有事件出现时就会被触发的回调函数。
const net = require('net');
var server = net.createServer(function (socket) {
    // 当有客户端连接上来时,它就会创建一个socket。
    // 用 on 方法添加监听器响应 data 事件。
    socket.on('data', function (data) {
        socket.write(data);
    });

    // once 方法,data 事件只是在第一次会被处理
    socket.once('data', function (data) {
        socket.write(data);
    })
}).listen(8888);
用 Node 内置的事件模版创建自己的事件发射器:
// 定义一个channel事件发射器,带有一个监听器,可以向加入频道的人做出响应。
var EventEmitter = require('events').EventEmitter;
var channel = new EventEmitter();
// 用on(或者用比较长的addListener)方法给事件发射器添加了监听器:
channel.on('join', function () {
    console.log('Welcome!');
})

// 用emit函数发射这个事件
channel.emit('join');
错误处理
创建发出 error 类型事件的事件发射器,而不是直接抛出错误。
// 创建一个错误监听器,将被发出的错误输出到控制台中:
const events = require('events');
var myEmitter = new events.EventEmitter();
myEmitter.on('error', function (err) {
    console.log('ERROR: ' + err.message);
});
myEmitter.emit('error', new Error('Something is wrong.'));
异步开发的难题
创建异步程序时,必须密切关注程序的执行流程、程序的执行状态…
// 示例:作用域是如何导致 bug 出现的:
function asyncFunction(callback) {
  // 200ms 后,执行回调函数
  setTimeout(callback, 200);
}
let color = 'blue';
asyncFunction(() => {
  console.log(`The color is ${color}`);
});
color = 'green';

// 输出结果:
// [Running] node "/Users/andy/Desktop/node/test_async.js"
// The color is green
用匿名函数保留全局变量的值:
// JavaScript 编程技巧:用闭包控制程序的状态
function asyncFunction(callbback) {
    setTimeout(callbback, 200);
}
var conlor = 'blue';

// 将 color 的值传给匿名函数
// color 变成了匿名函数的参数,也就是这个匿名函数内部的本地变量,
// 当匿名函数外面的color值发生变化时,本地版的color不会受影响。
(function(color) {
    asyncFunction(function() {
        console.log('The color is' + color);
    })
})(color);

color = 'green';
MDN web docs: JavaScript 闭包
异步逻辑的顺序化
流程控制:让一组异步任务按照顺序执行。串行 / 并行。
需要一个接着一个做的任务叫做串行任务。
不需要一个接着一个做的任务叫做并行任务。
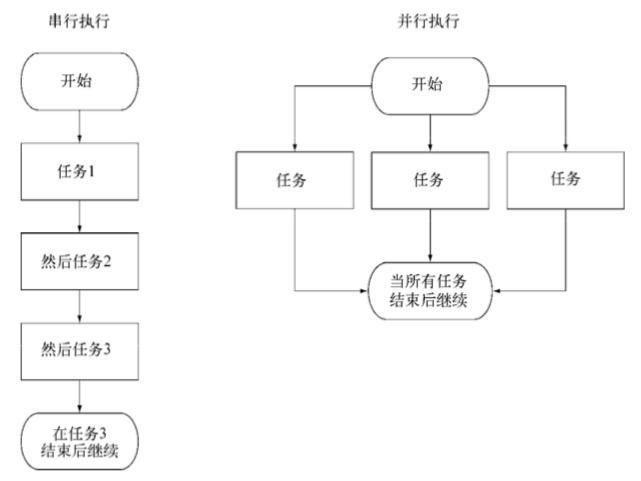
实现串行化流程控制
使用回调让几个异步任务顺序执行:
setTimeout(function() {
    console.log('1');
    setTimeout(function() {
        console.log('2');
        setTimeout(function() {
            console.log('3');
        }, 100); // 任务3,花费 0.1 秒
    }, 500); // 任务2,花费 0.5 秒
}, 1000); // 任务1,花费 1 秒第三方模块:Nimble:这个模块官网上显示 7 年没更新了😂😂😂,而且现在流行用 Promise 或者 async 来实现。
// 《Node.js 实战(第二版)》Async 示例:
const async = require('async');

// 给 Async 一个函数数组,让它一个接一个地执行
async.series([
  callback => {
    setTimeout(() => {
      console.log('I execute first.');
      callback();
    }, 1000);
  },
  callback => {
    setTimeout(() => {
      console.log('I execute next.');
      callback();
    }, 500);
  },
  callback => {
    setTimeout(() => {
      console.log('I execute last.');
      callback();
    }, 100);
  },
]);

// 执行结果:
// [Running] node "/Users/andy/Desktop/node/test_async.js"
// I execute first.
// I execute next.
// I execute last.
串行化流程控制的工作机制:
为了用串行化流程控制让几个异步任务按顺序执行,需要先把这些任务按预期的执行顺序放到一个数组中。
这个数组将起到队列的作用:完成一个任务后按顺序从数组中取出下一个。
Demo 示例:实现串行化流程控制。
实现并行化流程控制
为了让异步任务并行执行,仍然是要把任务放到数组中,但任务的存放顺序无关紧要。每个任务都应该调用处理器函数增加已完成任务的计数值。当所有任务都完成后,处理器函数应该执行后续的逻辑。
'use strict';

const async = require('async');
const exec = require('child_process').exec;

// 辅助函数:下载指定版本的 Node.js 源码
function downloadNodeVersion(version, destination, callback) {
  const url = `http://nodejs.org/dist/v${version}/node-v${version}.tar.gz`;
  const filepath = `${destination}/${version}.tgz`;
  exec(`curl ${url} > ${filepath}`, callback);
}

// 串行执行两个任务:
// 任务一:并行下载两个版本的源码;
// 任务二:将下载好的版本归档到一个新文件中。
// 用串行化流程控制保证在文件下载完成之前不会做归档处理。
async.series([
  callback => {
    // 并行下载
    async.parallel([
      callback => {
        console.log('Downloading Node V4.4.7...');
        downloadNodeVersion('4.4.7', '/tmp', callback);
      },
      callback => {
        console.log('Downloading Node v6.3.0');
        downloadNodeVersion('6.3.0', '/tmp', callback);
      },
    ], callback);
  },
  callback => {
    console.log('Creating archive of download files ...');
    exec(
      'tar cvf node_distros.tar /tmp/4.4.7.tgz /tmp/6.3.0.tgz',
      err => {
        if (err) throw err;
        console.log('All down!');
        callback();
      }
    );
  },
], (err, results) => {
  if (err) throw err;
  console.log(results);
});